- POS
- POS Compatibility
- Receipt Printers Setup
Receipt Printers Setup
The WineDirect POS application supports the printing of invoice style receipts from an AirPrint compatible printer or through the use of an AirPrint converter application on your printer network. Traditional retail receipt printing is available using a compatible receipt printer. The following documentation will assist you in setting up you receipt printer and connecting the application to it.
For additional setup or hardware support, please contact Star here.
or call Star Micronics at 800-782-7636, Option 2.
For printer connection tests also see Star's iOS Application.
Printer Hardware Setup: Learn the basic steps to connect a wired ethernet based printer to your router and network. Learn More >
iOS POS Printer Setup: Learn how to attach a printer to the iOS version of the POS. Learn More >
Desktop/Browser POS Printer Setup: Learn how to attach a printer to a desktop running WineDirect's POS through Google Chrome browser POS. Learn More >
Trouble Shooting: If you have trouble connecting your device to your Star Micronics printer, try these tips first Learn More >
Printer Hardware Setup
You can read everything there is to know about setting up your Star TSP143 from the Star Micronics manual:
https://www.starmicronics.com/Support/Mannualfolder/80877700_SETUP_SHEET_T1V3E.pdf
iOS POS Printer Setup
First, connect your device to your printer:
· IOS instructions: https://www.star-m.jp/products/s_print/tsp100iiilan/manual/en/settings/settingsLAN.htm#iosPairing
· Android instructions: https://www.star-m.jp/products/s_print/tsp100iiilan/manual/en/settings/settingsLAN.htm#AndroidPairing
Once your printer and device have been connected to the same wireless network, you are ready to assign the printer to your POS application:
1. Open WineDirect POS application on your device.
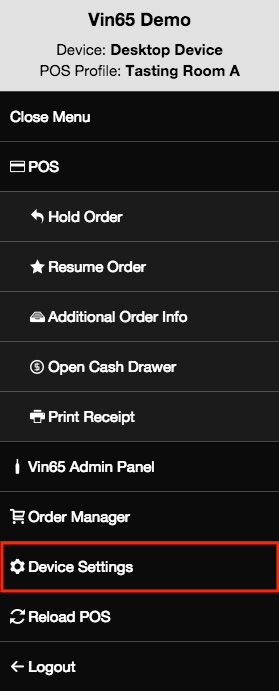
2. Go to the settings section of the POS application by clicking on the 3 bars on the top left hand side of your POS menu bar.

3. From the settings menu select Device Settings.
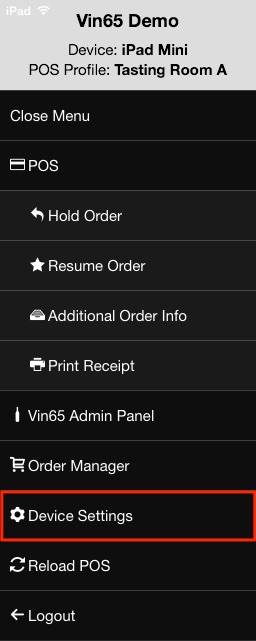
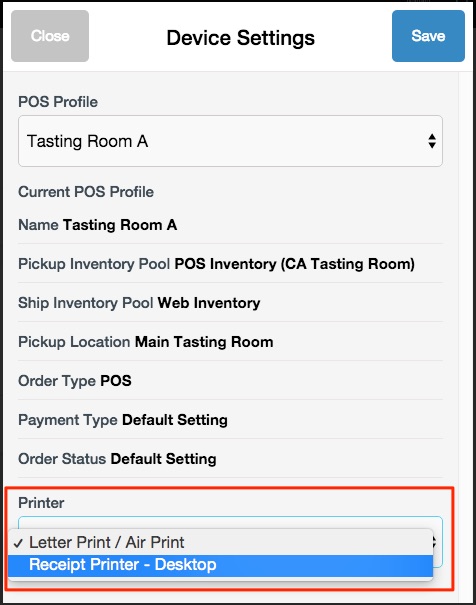
4. From the device settings window you will be able to view any available receipt printers on the network and assign them to your device.
The device settings section will scan for available receipt printers every 10 seconds. If there are no printers available when you enter the device settings section there will be a message that reads 'No Printers Found, Wait 10 seconds and Try Again'.
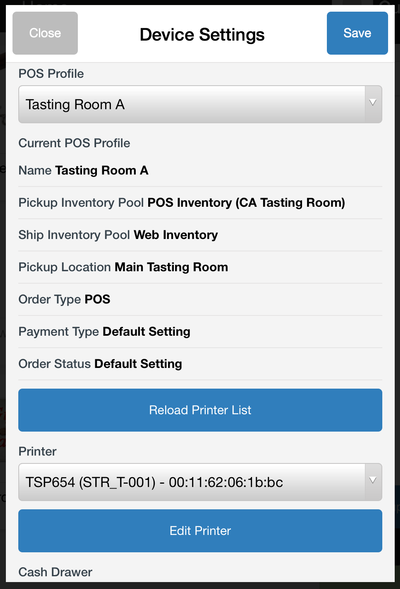
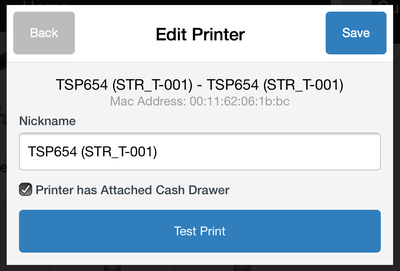
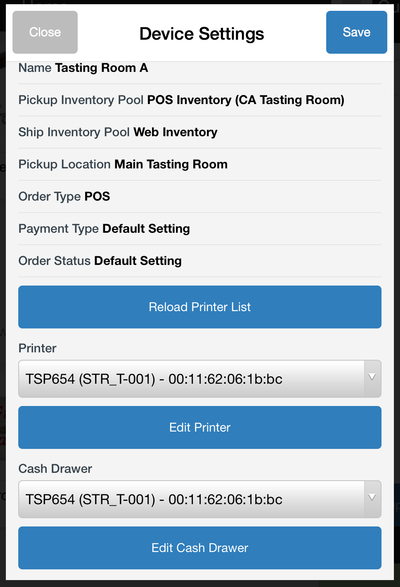
By clicking on the printer listed under the 'Printer' drop down section you will be able to adjust the name and assign a cash drawer to work with the printer (For more information please see the Cash Drawers Documentation).
5. From the Printer selection drop down, select the printer you wish to be associated with your device.
6. Save your settings.
Desktop/Browser POS Printer Setup
First, to configure settings, your desktop computer and printer must be connected to the same network. For assistance, visit: https://www.star-m.jp/products/s_print/tsp100iiilan/manual/en/settings/settingsLAN.htm#WindowsPairing
Then, once everything is on the same network, use a Google Chrome web browser to access the POS and log in:
· U.S. clients: https://pos.vin65.com
· Australian clients: https://pos.aus.vin65.com
Now, select your printer: Go to the settings section of the POS application by clicking on the 3 bars on the top left hand side of your POS menu bar.
For assistance, you may also call Star Micronics: 800-782-7636, Option 2

3. From the settings menu select Device Settings.
4. Under the Printers drop down select Receipt Printer - Desktop.
5. Now that the proper printer setting is selected on your POS application you will need to make sure that you install the Windows or Mac Drivers either from the installation disc provided by Star or by visiting Star's website to download the appropriate drivers.
You will also need to adjust the printer settings so that they are calibrated for the receipt width of 72mm x Receipt. Please note that not all settings may appear exactly the same depending on your printer.
6. On your PC locate your Printer Settings [Start Menu > Devices & Printers]
7. Right click on the printer icon with the name that matches your model (i.e. TSP143LAN) and select Printer Properties.
9. Locate the Advanced tab > select the tab Printer Defaults > make sure that the paper size is set to 72mm x Receipt.
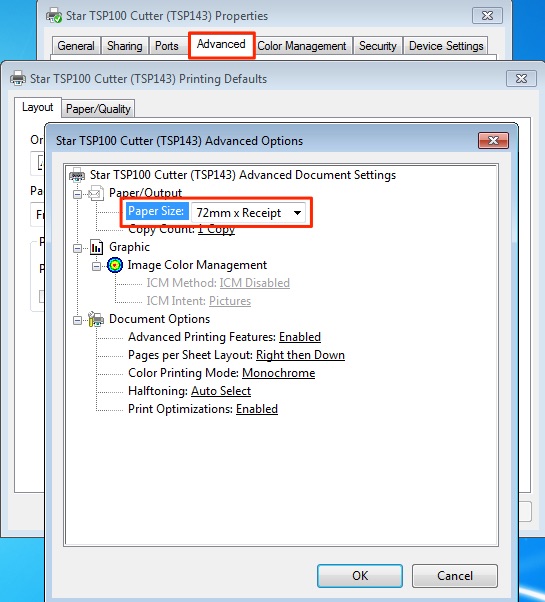
9. Click OK.
Please Note: The steps above are for a basic setup of your printer. For complete setup instructions please consult the hardware manual for your appropriate printer (Star TSP143LAN [TSP100 Series]).
10. Setup Google Chrome's Printer Settings.
Edit Google Chrome's Printer Settings
You will want to make sure that Google Chrome's printer settings are setup properly before proceeding with the setup of WineDirect POS on your Computer.
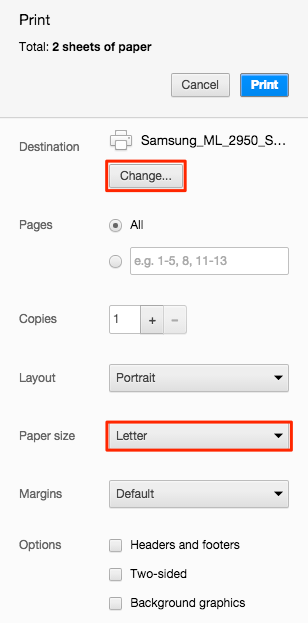
1. Open your Google Browser > click on the top right hand menu > Choose Print
2. Here an interface window will open up for the Printer Properties for Google Chrome. Ensure that you select the Receipt Printer that is connected to your network. You may need to press Change to change to the proper printer.
3. Click into the dropdown for the Paper Size and select 72mm x Receipt. If you are not using a supported Star Printer then you may have similar but different page size options displaying in this dropdown window.
4. Uncheck any options with checkboxes for headers and footers and for background graphics.
5. Now press Cancel beside the blue Print Button, Google will remember these setting changes.
Setup a Desktop Shortcut
You will want to have a desktop shortcut setup so that you can access the POS and have everything working smoothly.
The following steps will show you how to setup a Desktop Shortcut in the best way (we show you how to enable something called Silent Printing. It's really cool and it lets your system print smoothly with the least amount of disruption possible.)
1. Download & install Google Chrome here: https://www.google.com/chrome
2. Check that your receipt printer is set as your default printer.
3. Launch Chrome and check that the Chrome Version is at the latest version.
4. On your computer find your Chrome program. Right-Click on it, in the drop down choose Send To > Desktop (Create Shortcut)
5. Right-Click on that new shortcut and then choose Properties.
6. A window opens up and appears on the Shortcut tab. You will see a Target field containing information. At the end of the field add in " --kiosk --kiosk-printing". When you add it make sure it is [space]--kiosk[space]--kiosk-printing.
7. Below is how it looks on PC.
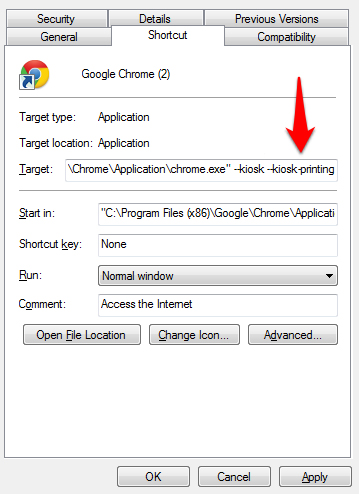
8. Kiosk mode will force chrome into a forced fullscreen mode and allow silent print where the print dialogue popup will not appear again. It would be a good idea to rename the chrome shortcut to WineDirect POS or something like it. When done press Apply.
Now your Desktop Version of Vin65 POS will operate the smoothest. Just open up that Shortcut each time.
-
If you need to exit kiosk mode, press the Windows key on your keyboard, and close the kiosk window from the task bar.
- If you need to use chrome in non-kiosk mode, you will want to create another shortcut on the desktop without the Kiosk mode tags.
WineDirect POS Desktop can remember your POS Profile you set on that computer. If you Delete your Cookies you will need to make sure you setup your POS Profile for that computer again. More information about Setting up POS Profiles can be found here.
Troubleshooting
If the printer isn't showing up as an option in the WineDirect POS, the issue likely rests in your network. Here are the most common solutions to frequent receipt printer issues.
Please note that WineDirect does not provide hardware support. If you purchased your printer from WineDirect Payments, they can help, or you may call Star Micronics directly: 1-800-782-7636.
iOS or Android (Tablets, smartphones, etc.)
- Confirm the printer is a supported Star Micronics printer.
- Confirm the printer is connected to the same network as the wifi the device.
- Download the Star Micronics App:
- iTunes App Store: https://itunes.apple.com/ca/app/stario-sdk/id569792039?mt=8
- Google Play Store: https://play.google.com/store/apps/details?id=com.StarMicronics.StarIOSDK&hl=en
- Call Star's support line and with them, print a sample receipt through wifi (not Bluetooth).
- Call Vin65 if steps 1-4 are complete.
Please Note: If you are not able to print a sample receipt (in #4 above) then Vin65 will not be able to assist. You will want to first call Star's support and/or your network/wifi support company or person.