- Store
- Shipping (V2)
- Shipping Setup
Shipping Setup
In order to start shipping wine, you'll need to create a shipping strategy and set up at least one method of delivery that you want to offer, the zones that you want to allow shipping to, and finally at least one rate associated with each.
In This Article
Shipping Strategies
Shipping strategies define how your wine is shipped and the rates that'll be charged to your customers.
You'll need at least one shipping strategy that'll be used automatically for orders placed online, in the Admin Panel, and for shipping orders on the Point of Sale. We call this your "Primary" shipping strategy.
If you have multiple shipping strategies created, on the Shipping listing page, you can select which one you'd like to be used by default by clicking the three dots (•••) beside the strategy that you want and selecting "Make Primary".
If you want to set up a different pricing structure for your club shipping or for specific products (such as one for wine and one for merchandise), you can create multiple shipping strategies. When setting up your club shipment or editing a product, you'll have the option to select which shipping strategy it should use.
Skip to next step: Shipping Methods »
Adding A Shipping Strategy
1. In the Admin Panel go to Store > Shipping and click (+).
2. Give your shipping strategy a Name.
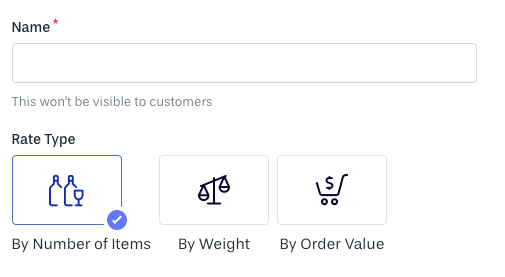
3. Depending on how you'd like to charge customers for shipping, select a Rate Type.
If you want your shipping rates to reflect how you'll be charged by your carrier, we recommend looking that up first since the Rate Type cannot be changed after the strategy has been created.
- Shipping by Number of Units
- Shipping by Weight
- Shipping by Order Value
Shipping Methods
Shipping Methods are the types of shipping that you want to offer when fulfilling your orders such as Ground, 2 Day, Overnight, and Air. Depending on the fulfillment provider that you're using, there may different options available for you to set up.
Skip to next step: Shipping Zones »
Adding A Shipping Method
1. In the Admin Panel go to Store > Shipping, select a shipping strategy and under Methods, click Add Method.
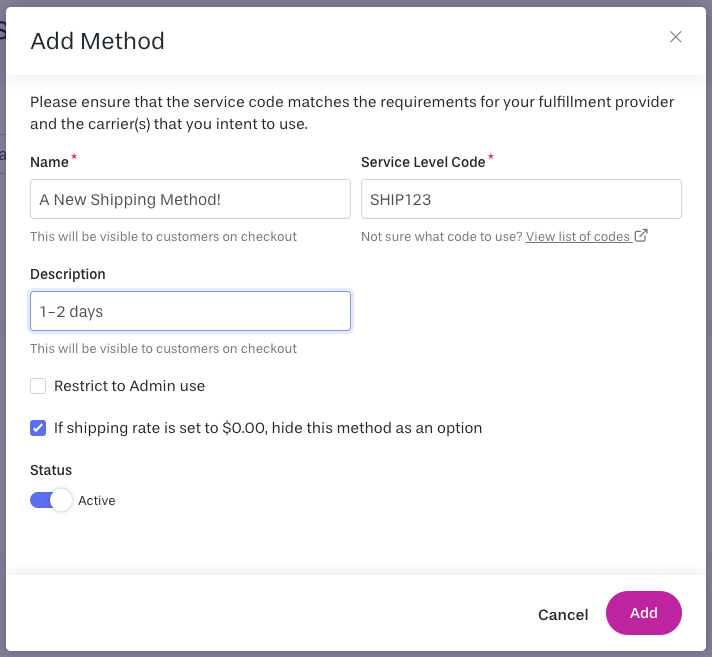
2. Give your method a Name that's descriptive for you and will let your customers know what they're selecting such as Ground or 2Day.
3. If you're using a fulfillment provider, you'll need a specific Service Level Code. Click here for a list of service level codes. If you are self-fulfilling, you can set the code to be whatever you'd like.
4. Optionally enter a Description for your shipping method. This will be visible to your customers when they are checking out online.
5. If you only want this shipping method to be selectable by staff in the POS or Admin Panel, select to Restrict to Admin Use.
You can allow Admins to use and select this shipping method for any orders placed in the Admin Panel or POS or be able to only allow use when processing a club shipment.
6. You'll most likely want If shipping rate is set to $0.00, hide this method as an option to be selected. This will make sure that if you create any $0.00 rates for this method, the method will be hidden as an available option when an order is being placed.
In the previous shipping strategy interface, rates were automatically created for all shipping methods starting at $0.00. This setting ensured that you wouldn't accidentally offer $0.00 shipping due to a rate not being fully set up. If you're using the upgraded interface, you have the option to create only the rates that you need and delete those that you don't.
7. Set the Status to Active if you want it to appear for customers and your staff or set it to Inactive if you don't want this method to be used quite yet.
8. Click Add when you are done configuring your shipping method.
You'll need at least one zone and one rate set up before your customers will be able to ship their wine using this method
Managing Shipping Methods
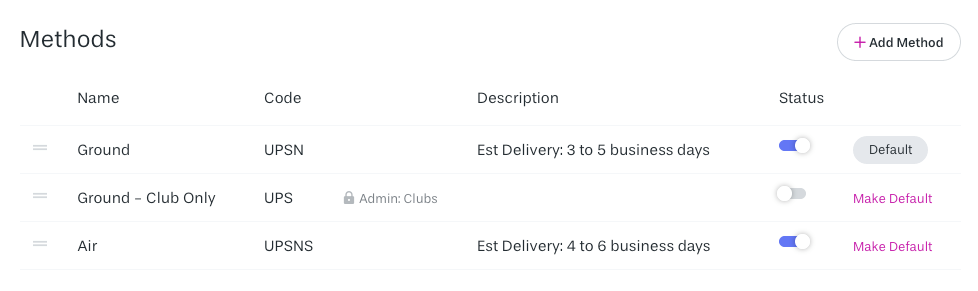
From the list of shipping methods that you've created, you'll be able to:
- Re-order them to adjust the display order by clicking on the icon on the left to drag and drop.
- Set methods to active or inactive by clicking on each Status toggle
- Click Make Default to choose the method that you want to be selected by default when an order is being placed online
- Edit or delete your method by clicking on the name
Note: When you delete a shipping method, it will delete all rates that you've set up for that specific method
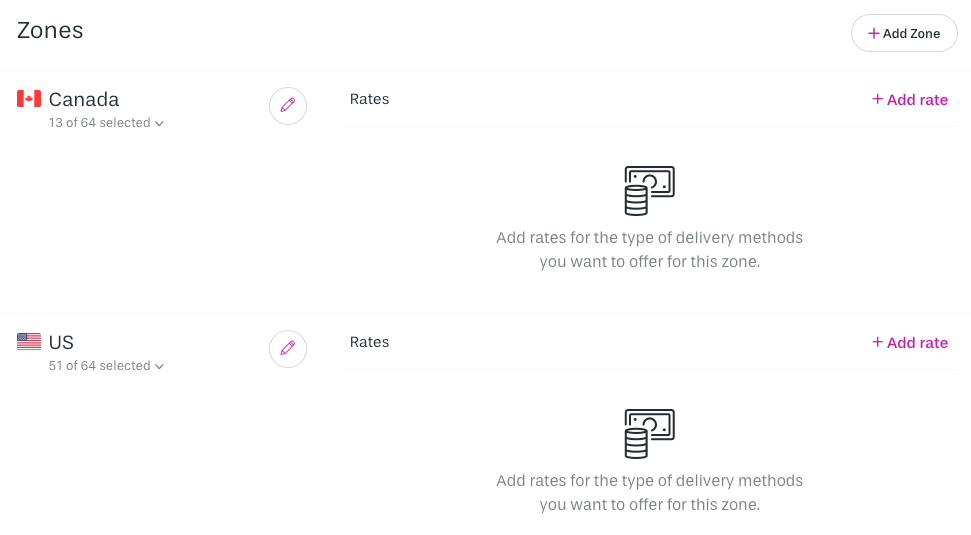
Shipping Zones
Zones allow you to charge your customers different shipping rates based on where they are located.
By grouping states or provinces together into different shipping zones, you'll then be able to create rates based off of: where they are located, the method of shipping that they selected, and the items in their cart.
Skip to the next step: Shipping Rates >>
Adding A Shipping Zone
1. In the Admin Panel go to Store > Shipping, select a shipping strategy and under Zones, click Add Zone
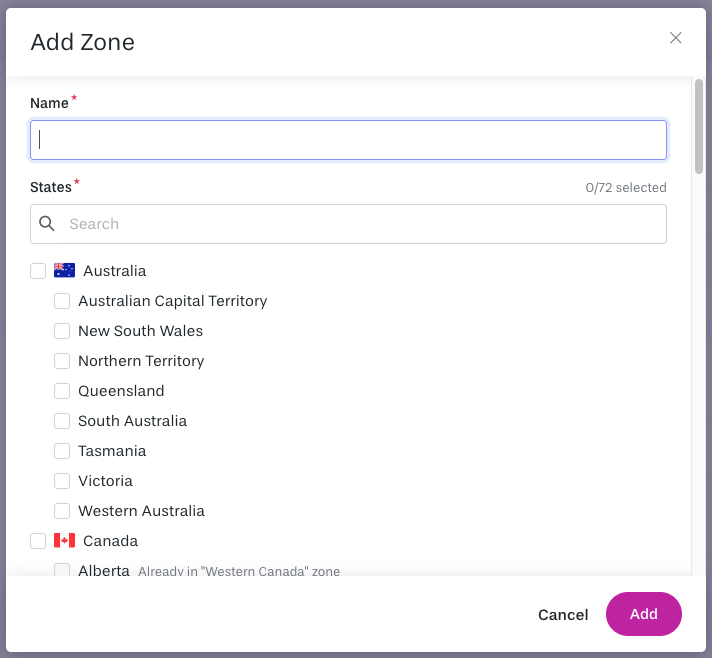
2. Give your shipping zone a Name. This is for your internal use only.
3. Select or search to find the states/provinces that you like to include.
Select a country to check off all of its states or provinces. If there are any that you'd like to exclude, you can uncheck them.
Shipping Zones cannot be split into regions of a State or Province. The shipping rates that are attached to that zone will cover the entire State or Province.
4. When you're done, click Add
Managing Zones
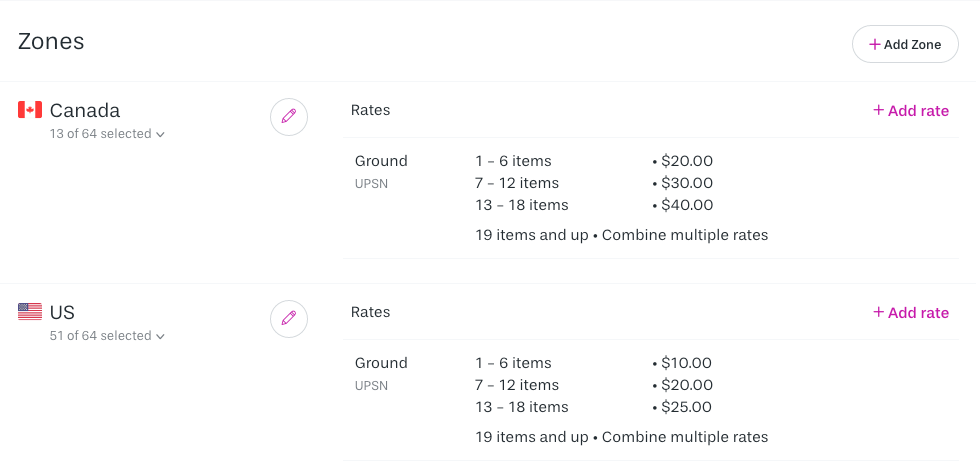
Once your zones are created, from the main page you'll be able to see a preview of all of the states / provinces in each zone by clicking the number count (ie. 13 of 64 selected)
You can edit or delete a zone by clicking the pencil button. Deleting a zone will also remove any rates associated with it.
Shipping Rates
We're almost there! Once you have setup your shipping methods and the zones that you want to ship to, you can start creating rates. We recommend keeping your rates as simple as possible, and offering flat rate shipping wherever possible.
You can enter your rates manually from the shipping Rates area, or you can use the Shipping Rate Importer
Adding A Shipping Rate
1. In the Admin Panel, go to Store > Shipping > select a shipping strategy. In the Zones section, under the specific zone that you'd like to add rates for, click Add Rate
2. Since pricing will be different based on the type of delivery that the customer chooses (for example Ground vs Air), you'll need to set up rates separately for each method that you're offering in the zone. Select which Method you want to begin entering rates for.
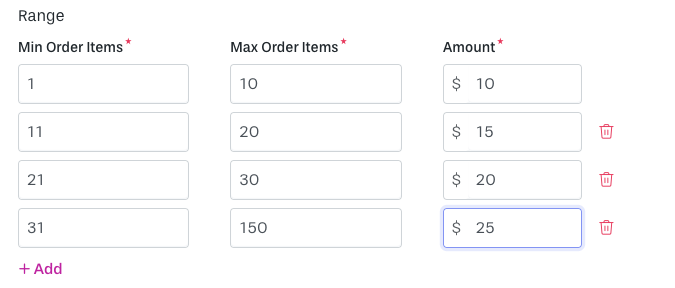
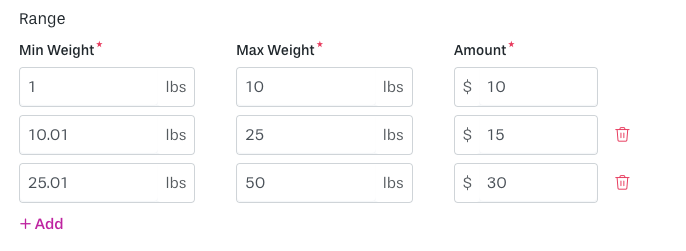
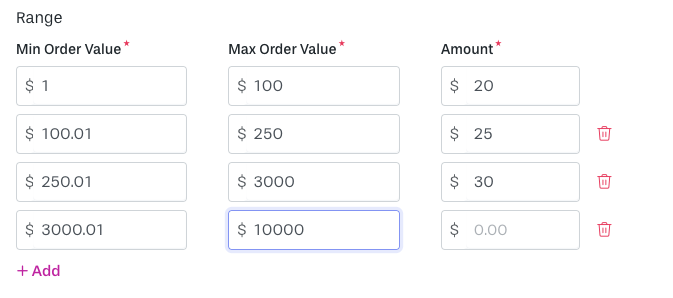
3. Based on the Rate Type that you chose when you first created your shipping strategy, you'll be able to input the applicable data and the amount you want to charge.
- If your Rate Type is By Number of Units - Assign rates based on the number of items a customer has added to their order.
- If your Rate Type is By Weight - Assign rates based on the weight of the customers order.
- If your Rate Type is By Order Value - Assign rates based on the customers total order value.
5. For Order Above Range is where you can decide what you want to happen for orders that are don't fall under a rate that you set up.
For example: In the image below, you can see that rates are set up if a customer has 1-10 items or 11-20 items in their order. What should happen if a customer is ordering 25 items?

You can choose which you'd prefer to happen:
| Combine multiple rates |
If an order goes above the top range, it will combine multiple rates to make up the difference. For example: If you've only set rates for up to 20 items, but the order has 25 items, it'll use the 20 item rate, and add the 1-10 item rate to cover the extra 5 items. |
|---|---|
| Charge an overage for additonal items |
Instead of calculating and combinging together existing rates, this option will allow you to charge a specific dollar amount for every extra item. For example: If you've only set up rates for up to 20 items, but the order has 25 items, it'll use the 20 item rate, and I can say that for every 5 extra items, I want to charge $5.00. |
6. When you're rate is complete, click Add
You'll want to continue adding in rates until you've completed adding shipping prices for all of the methods that you want to offer in each zone.
Managing Shipping Rates
To edit or delete any of your existing shipping rates, click on the rate itself, and the shipping rate modal will open.
- Do I need to have all of my states / provinces assigned to a zone?
- Can I split a state across multiple zones?
- When I select a shipping strategy in my club shipment, what happens when a client from a particular zone does not have rates set up for the method that I chose?
- What if you already have your shipping strategy set up and want to set up a flat rate shipping sale?
Do I need to have all of my states / provinces assigned to a zone?
No, you do not need to have all of your states / provinces assigned to a zone, but if a state is not included in any your shipping zones, customers from that state/province will not be allowed to ship their order.
Can I split a single state across multiple zones?
No, states cannot be split into the different regions of a State or Province. The shipping rates that are attached to that zone will cover the entire State or Province. You'll want to select a rate that'll balance out the cost of both areas.
When I select a shipping strategy in my club shipment, what happens when a client from a particular zone does not have rates set up for the method that I chose?
When processing a customer's club shipment, the system will check the selected shipping strategy and the zone that the customer is a part of and it will then look to find the amount that it should charge that customer based on the shipping method that you selected.
When there are no rates set up for that customer's zone in that specific shipping method, if there is another shipping method available, it will charge that rate instead.
What if you already have your shipping strategy set up and want to set up a flat rate shipping sale?
You can learn more about how to set this up here.
Why can't I add a state to multiple zones?
For a single strategy, each state should only be included in one zone. Zones should be created for each grouping of customers to receive a specific shipping rate. If, for example, California was added to two different zones, then a rate is created for each of those zones, the system will not know which price to charge. In a single strategy, we've blocked the ability to add a state to two separate zones to ensure that customers won't experience issues when checking out and that you're charging the right rate.