- Settings
- Import/Export
- Address Book Importer
Address Book Importer
Need to import multiple shipping addresses to a customer or multiple customers? Check out the three ways to add multiple address to a contact below to make your life easier.
Add It Manually: Learn two ways how to add addresses manually. Learn More >
Import Shipping Addresses: Learn how to import addresses. Learn More >
Create A "Fake" Club: Learn how to import multiple addresses for non-club members. Learn More >
Add Addresses Manually
If you only need to add a few addresses to contacts, adding them manually is going to be the easiest and fastest way. Follow the steps to learn how to do this:
1. Navigate to Contacts, select the desired contact, then click on the Address tab of the Contact record. Click the green plus button to Add An Address Book Entry.
Add A New Address Book Entry
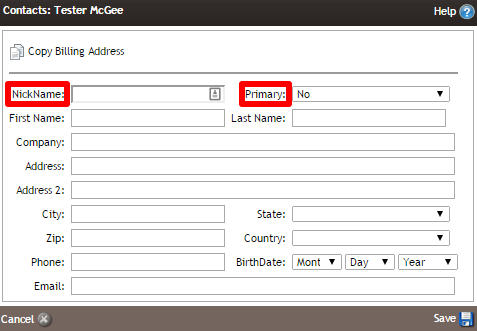
The Address tab allows you to view and add any shipping addresses for use in orders and club shipments. Any shipping address added by the contact online or by an admin user will be stored here. Along with general contact information you can also assign addresses Nicknames or designate them as Primary
| NickName | Allows a Nickname to be assigned to a shipping address to easily help identify alternate addresses. This is useful for contacts with numerous shipping addresses or for wineries who “Gift” Club Memberships. Examples: Work, Vacation Home, Uncle Bob, For Club, etc. |
|---|---|
| Primary | A shipping address that is marked as “Primary” will automatically be used as the shipping address when a customer logs in to make a website purchase. This functions similar to billing information that auto populates when a customer logs in. If no primary address is selected, a customer will have the option to choose or enter an alternate shipping address to be used. |
The Primary address does not update the alternate shipping address attached to a Cub Membership. This adjustment must be made on the Club tab of a customer's record. For more information please see the Clubs Documentation.
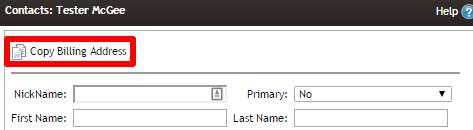
Copy Billing Address
If you want to copy the billing address into the list of addresses in the Addresses tab you can click to Add An Address Book Entry, then the Copy Billing Address button.
Import Shipping Addresses
This option works best if you have a lot of addresses to import for a single contact, or your only importing a few contacts.
1. Select the contact record you are importing to.
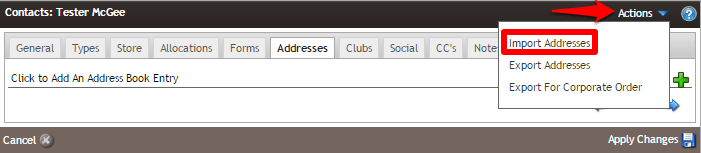
2. Navigate to the Address tab, then click on the Actions drop down menu located in the top right corner.
3. Select Import Addresses from the menu, then Upload the file (in the correct format). Click Import.
*If you don't already have a copy of the sample file that you will need to base the import on (the spread sheet format must match the Vin65 sample file), you can choose to Download Sample File to download the excel file, which will appear on the screen after you click Import Addresses.*
Create A 'Fake' Club
This option works best if you have a lot of customers that need multiple addresses that are not club members. If they are club members, you should not do this step, as the addresses for club members will be handled by your regular Club Member Import.
*This option is somewhat of a work around and even though these steps are on the documentation site, they may not work for you. Before you do this, please note the following issues:*
1. A fake club will be in your Vin65 system/admin for forever, you are not able to delete it. There is no work around here.
2. If you want to have the clubs not show online to the consumer, you need to deactivate the club to make in 'inactive'.
3. If you want to remove the club membership from a contact, you would need to manually delete the membership from the contact's record (i.e. if there are 100, you need to manually delete 100 memberships). Note that this means a lot of clicks to get rid of a lot of memberships.
4. If a customer has 5 shipping addresses, it creates 5 club memberships. Ideally, Vin65 would recommend you use the import option per contact over the fake club option.
5. You will need to remember to exclude the fake club from all emails, lists, etc. whenever you want to reach out to your club members.
6. A fake credit card number needs to be added to the club member import (a required item in the club import).
7. Biggest reason to not import fake clubs - The fake credit card will be saved to their customer profile. This may (and likely will) confuse customers. They will think they have a wrong credit card on file (but they would see XXXXXXXXXXXX1234 in their profile) - This could be a PR nightmare for you if a customer thinks your credit cards are wrong. You could manually delete each credit card on file after the import to mitigate this issue.
Only if you're ok with the issues above should you move onto the next steps below:
1. Create a club, typically called 'Fake Club'.
2. Enter your contacts information into the Club Member Import sheet. Note that your contact's billing address should be their billing info. The shipping address for the club should be one of their additional addresses.
3. If they have multiple addresses, the contact should have multiple clubs in the sheet (i.e. they should populate multiple rows. The club should be the same, the billing address should be the same, but the shipping address should change for each additional shipping address).
4. Import the file into the club import tool (Settings > Imports/Exports > Club Member Import).
5. Deactivate the club from the club list/setup tools by unchecking the Is Active? box. This will make the club not visible to your contacts online in their club section. It will still be visible in the admin panel to your staff and will not go away unless you delete it from the member's individual record.