Product Sets
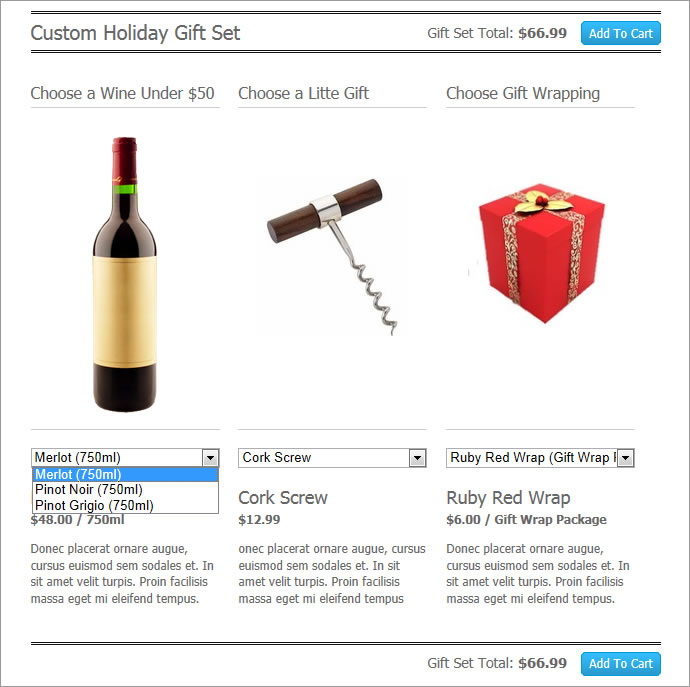
Product Sets (or gift sets) give you the ability to create a custom product selection on the frontend of your website. This allows you to offer your customers custom product gift sets where they can choose from a variety of options and then click a single add to cart button to purchase the order.
Create A Product Set: Learn how to create a product set. Learn More >
Add Products To Each Option: Learn how to add products to each option. Learn More >
Add Product Sets To Website: Learn how to add product sets to your website. Learn More >
Video Keypoints:
- 00:40 Add a Product Set
- 01:55 Adding items to a Product Set
- 03:30 Adding Product Set to website
Create A Product Set
1. Navigate to Store > Products > Product Sets.
2. Click Add a Product Set [+] on your left hand side.
3. This will open up the product set window where you will start on the General Tab.
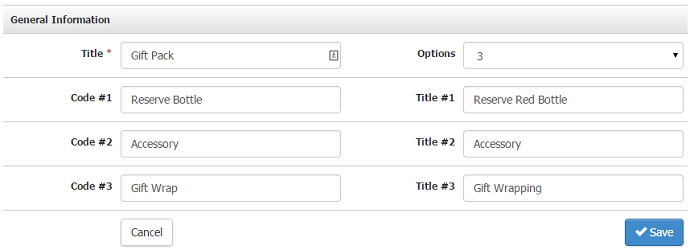
General Tab
The General tab is where you will setup the basic information for the product set.
1. Give your product set a name in the Set field.
2. Choose the number of options within your gift set.
3. Add the names for each of your options in the Code #1 and Title #1 field.
4. When finished, click Next to proceed with adding products to each option.
This feature may require design changes and you may incur a small design fee. Please contact support@vin65.com if you're interested.
Table of Definitions
| Title | This is the name of your product set that will appear on your website.
Example: “Create your Own Gift Set” |
|---|---|
| Options | You can have up to 4 options (drop down menus) per gift set. When you select the number of options you wish to have, they will automatically show up below. |
| Code # | The name attached to each of your option tabs as they appear in the admin panel. (Tabs with your code/name will appear after you hit next). Typically a short name:
Examples: Wine, Red Wine, Product, Glassware, Packaging |
| Title # | The title that customers will see on the website for each option of your options.
Examples: “Choose a Wine” or “Select a Product” |
Add Products To Each Option
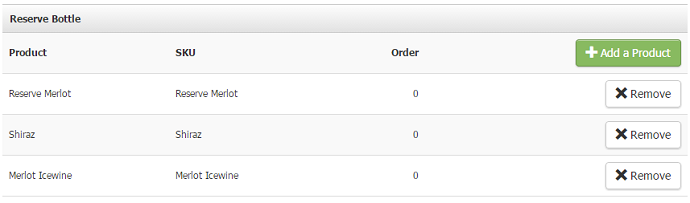
Once you have entered in your code # for each respective option, you’ll see they will appear as tabs. For example, if you have chosen 3 options, with Code #1 being Red Wine, Code # 2 being White Wine and Code #3 being Products, the following tabs will be labeled Red Wine, White Wine and Products. In each tab you can select the products that will appear for each option.
1. Click the green [+] button to add an item.
2. You can search for the product in your inventory by searching by SKU, Name, Brand or Category and then clicking the magnifying glass. To search all of your inventory, click the magnify glass and leave the fields blanks.
3. Check off the products you wish to add, and click Save. All of the products will appear in the tab. Click Next and continue on to the next tab until you’ve added products in for each option/category.
4. Click Apply Changes.
Complete these steps for each option tab:
Add Product Sets To Website
You can only add 1 product set per website page. Multiple sets require an individual site page for each product set. If you want to offer multiple sets you will have to create multiple store pages.
1. To add a product set to a page, you will need to add it as a component.
2. Under Content Editor > General pages locate the page you want to add your gift set to.
3. Open the page. Place your cursor where you wish the gift set to appear in your content and use the component button to add the gift set to your page.
4. Click Save Page to finalize your change.
For additional information on adding components please see the Adding Components Documentation.
Product Sets do not currently work on mobile sites. We suggest making the mobile version of the page you have your product set assigned to 'Hidden' so that it does not appear on your mobile site. For more information on marking a page as hidden please see the Page Properties Documentation.