- Store
- Products
- Product Properties
- Photos
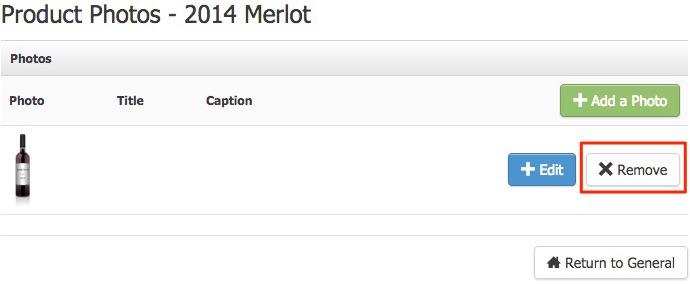
Manage Product Photos
While your main product image can be added from the General Information section of the product the Manage Photos section allows you to add additional product shots and/or delete any product shots.
Adding Addtional Product Photos: Learn how to add additional product images to a wine or product. Learn More >
Deleting Product Photos: Learn how to delete product images/photos from a product. Learn More >
Adding Additional Product Photos
1. Navigate to Product Properties > Manage Photos.
2. Click Add a Photo [+].
3. Press Browse to get the image from your computer.
4. Click Edit to edit an existing photo > you can switch out the original image with another one.
5. Press Save.
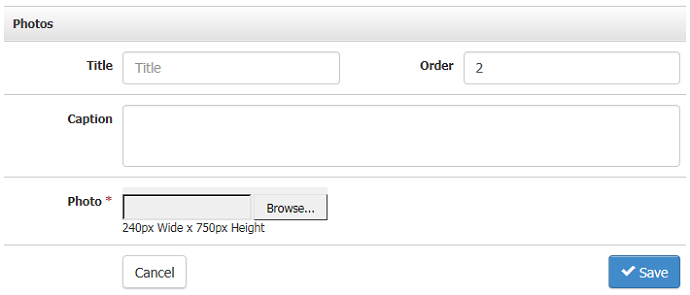
| Title | This will display in the Admin Panel and is used for your own organizational purposes. It will not be visible on the website. |
|---|---|
| Order | The "Order" number will decide how it displays both in the Admin Panel and the website. If there are multiple pictures to choose from on a single product, the one in the first position, "Order: 1", will display on the website. You can control how the images are sorted with the order field. |
| *Photo | You must upload a photo from you computer in order to Save this photo. Be sure to follow the dimensions of the suggested pixel height and width. The photo file name must not have spaces or special characters in it. |
*Required Fields
Images must follow these requirements:
Must be in JPG or PNG format.
Must be RGB color format.
File name cannot contain spaces or special characters such as *&.^%$#+.
Should be no larger than 500KB (half a megabyte) for website load times.
Must be in JPG or PNG format.
Must be RGB color format.
File name cannot contain spaces or special characters such as *&.^%$#+.
Should be no larger than 500KB (half a megabyte) for website load times.
Deleting Product Photos
Product images are only saved to the product they are attached to. If you delete a product or a photo image will be deleted. You cannot recover the image so it would be best to save a backup before deleting an image/photo.
1. Navigate to Product Properties > Manage Photos
2. Click Remove next to the photo that you want to delete.