Product Types
Learn about setting up each unique Product Type.
Wine: Setup a Wine Type and the unique settings for Wines. Learn More >
Wine Product: Setup a Wine Product Type and the unique settings for Wine Products. Learn More >
Product: Setup a Product and the unique settings for Products. Learn More >
Product Bundle/Set: Setup a Product Bundle with the specific steps needed for Product Bundles. Learn More >
Gift Card: Follow these steps for setting up a Gift Card. Learn More >
Event Ticket: Setup an Event Ticket and the unique settings for Event Tickets. Learn More >
Spirit: Setup a Spirit and the unique settings for a Spirit. Learn More >
FAQS: Review frequently asked questions regarding Product Types. Learn More >
Adding Products
Here you will learn how to create a basic Product in Vin65.
Make sure that your Product Name and SKU does not exceed 50 characters or contain special characters such as +$%^&*.
General Information
1. Click Add a Product [+] > Choose your product details.

| Product Type | Choose from the list of Product Types to control what kind of Product you will create.
|
|---|---|
| *Product Name | The name of your Product. This is a mandatory field and should be less than 50 characters. |
| Sub Title | Use this as an additional title for your product on your website. |
| POS Title | This is used on the Vin65 POS when you need a shorter name to recognize your product. |
| Shipping Strategy | This is normally set to "Use Default" but can be changed to use a different Shipping Strategy. |
| *Bottle Size | Put your bottle size in this field. This is a mandatory field. You will need to have bottle sizes added. Learn More > |
| Photo | Upload a photo in JPG or PNG format from your computer that follows the recommended pixel width and height. |
| *Product SKU | This will be the SKU of your product. The best practice is to keep it as short as possible and avoid using any special characters such as @ & # etc. |
| Product Brand | This should be the brand of your product. You can add many brands to Vin65. Learn More > |
| Unit Description | Tell us the descriptuon of your unit. This could be a "Balcony Seat" for an Event Ticket or a "Bottle" for a standard wine. |
| Weight | Say the weight in lbs here. Just use a singular number such as "3", don't type in the "lbs" part. |
| Retail Price | This should be the standard price that you are charging your customers. |
| Sale Price | This is the sale price of your product. If left blank the Retail Price will be the authority. Once you put a dollar amount here this will be the displayed price. |
| Bottles In Case | If left blank, this field will have no effect on your website. If you put a number in here such as "12" then you can have a "Buy Case" button display automatically on your website. |
| Alcohol % | Say the percentage of alcohol on the product. |
| Region | Name the region that the grapes come from. You can create multiple regions. Learn More > |
| Appellation | Name the appellation that the wine comes from. You can create multiple appellations. Learn More > |
| Wine Type | Put the wine type here. Your wine type would be Red, White, etc. You can create multiple types. Learn More > |
| Varietal | Put your varietal here. You can add more varietals in Vin65. Learn More > |
| Vintage | |
| Is Active? | Check this box so that your product is sellable in the Admin Panel. |
| Display on Website? | Check this box so that your product is able to be bought from your Website. |
*Required Fields
2. Once complete press Save.
Teaser
The teaser is a brief sentence or two to pique the interest of your customer.
1. Click Edit > Now add your content.
2. When finished press Save.
Description
The description is a section for you to add more information. You can explain as much about the wine as you want in this area. You are able to include images and you can treat this section like the Content Editor toolbar.
1. Click Edit > Now add your content.
2. When finished press Save.
Make sure that you do not leave the teaser or description unfinished without pressing save. The Admin Panel session could timeout and you could lose your draft.
Categories
Add which pages and sections of your website you want your products to appear.
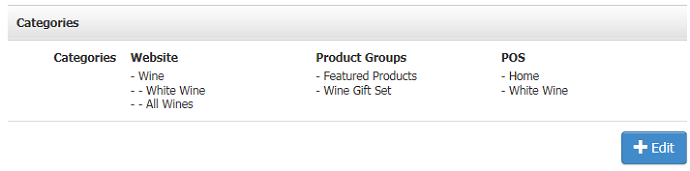
1. Click Edit, then check the boxes for the pages you want your product to appear on.
2. Press Save.
Marketing
Here you can customize the Marketing URL for your customers to access. You can also download the QR code for printing on bottles and edit the Meta Tag data.
1. Click Edit > make the changes you desire in the Marketing URL field, Meta Tag Title and Meta Tag Description.
2. Press Save.
Product Type FAQ's
- My Product isn't showing on my POS, but it is on my Website. How to I get it to appear on both of them?
- I have uploaded a colour image to my product page, however it appears within the system and on the website in black and white. What is happening?
- I get an error when I try to generate the shipping labels for one of my orders. Could it be something to do with the product settings?
My wine/product appears on my website but not on my POS. How can I get it to show on both?
Your product most likely has been assigned a Category on your Webiste, but not your POS system. Check the Category header under the product in questions and make sure that the product has been assigned a category under both the "Website" and "POS" subheaders. Simply hit edit and check the areas of the POS/Website that you wish to add the product to!
I have uploaded a colour image to my product page, however it appears within the system and on the website in black and white. What is happening?
It is most likely the case that the image was saved with a CMYK colorspace.
CMYK is the color space most often used for Print documents. We reccommend re-saving the document with a web friendly color profile (in Photoshop this is Save for Web), and making sure it is saved as RGB. RGB is the standard web friendly color space.
I get an error when I try to generate the shipping labels for one of my orders. Could it be something to do with the product settings?
Product weight, along with Packaging weight, is taken into account when generating your shipping labels. Make sure that if you are generating shipping labels within Vin65 to include weights on your products!