- POS
- POS Compatibility
- Cash Drawers Setup
Cash Drawers Setup
The POS application supports the use a a cash drawer for cash transactions. You will have the option to choose whether to trigger the cash drawer or not while placing the transaction depending if the order is being placed in the tasting room near the cash drawer or else where at another location where access to the drawer is not possible. The flowing information will review the setup and use of cash drawers with the POS application.
Connecting Your Cash Drawer: Connect your cash drawer to your printer. Learn More >
Assigning A Cash Drawer: Learn how to set up the cash drawer on the mobile and desktop POS. Learn More >
Open Cash Drawer: Learn how to open the cash drawer. Learn More >
Connecting Your Cash Drawer
Bellow are a few basic setup steps to connect your cash drawer. Cash drawer functionality requires a compatible receipt printer to be setup. For information on setting up your printer please see the Receipt Printer Documentation.
What you'll need:
- Compatible Receipt Printer: Star TSP143LAN or Star TSP650
- Compatible Cash Drawer: APG Vasario 1416
- Cash Drawer Compatible Ethernet cable *Standard Ethernet Cables NOT Supported*
- iPad, iPod, or iPhone with Vin65 POS application installed
Setup
*Please Note: Cash drawer functionality requires a compatible receipt printer. The cash drawer can not be used independently with the POS application.
1. Connect one end of the ethernet cable to the port on the bottom of your cash drawer.
2. Connect the other end of the ethernet cable to the peripheral drive port on the rear of your recipet printer.
Assigning A Cash Drawer
Once your cash drawer has been connected to your printer you will be able to assign a cash drawer to you printer and the POS application.
Please Note: Cash drawer functionality requires a compatible receiptt printer to be setup. For information on setting up your printer please see the Receipt Printer Documentation.
Mobile POS Cash Drawer Setup (iOS/Android)
- Open Vin65 POS application on your iPhone/iPad/iPod.
- Click the 'Device Settings' button in the side menu to access the settings section.
- From the menu select Device Settings.
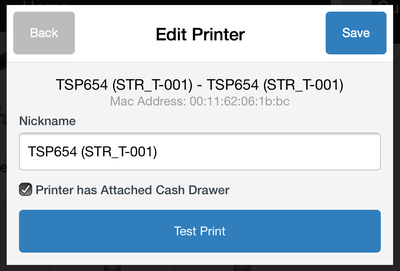
- Select the printer you have connected the cash drawer to. From the Editor Printer window check the 'Printer has Attached Cash Drawer' box and click 'Save'.
5. From the Cash Drawer selection drop down, select the printer the cash drawer is connected to.
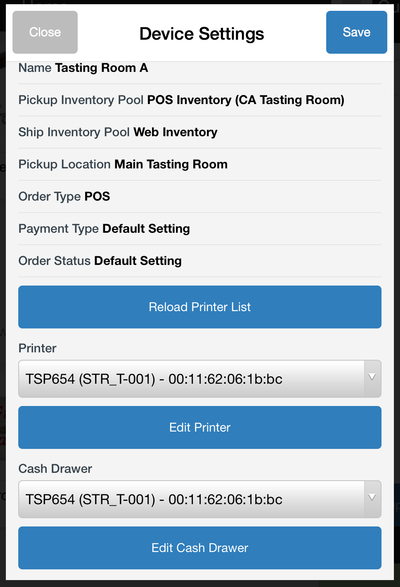
6. Save your settings.
Desktop POS Cash Drawer Setup (Windows)
- Open Vin65 POS application in Google Chrome (pos.vin65.com).
- Click the 'Device Settings' button in the side menu to access the settings section.
- From the menu select Device Settings.
- Select the Receipt Printer - Desktop printer option.
You will then need to set up the receipt printer device settings in Windows:
- Go to Start Menu > Device Settings > Printers
- Right click on the receipt printer and select Printer Properties
- Go to the device settings tab
These are the settings you will need to ensure are set correctly:
- 72mm x Receipt
- Peripheral Unit Type = Cash Drawer
- Peripheral Unit 1 = Document Top
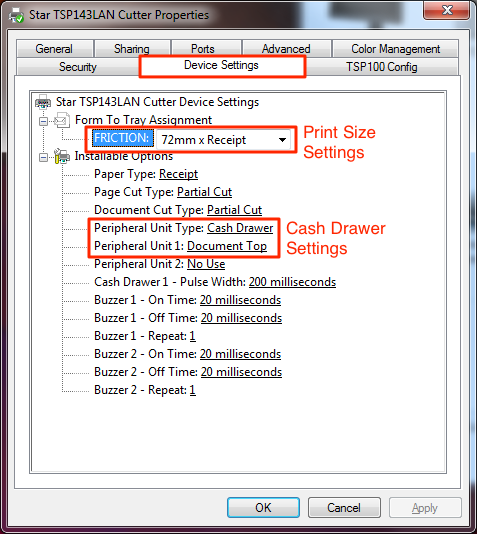
Depending on the printer and operating system you are using this settings dialogue may appear differently.
Be sure to select 'Apply' after making any changes. You may also want to try restarting your computer, and printer.
Open Cash Drawer
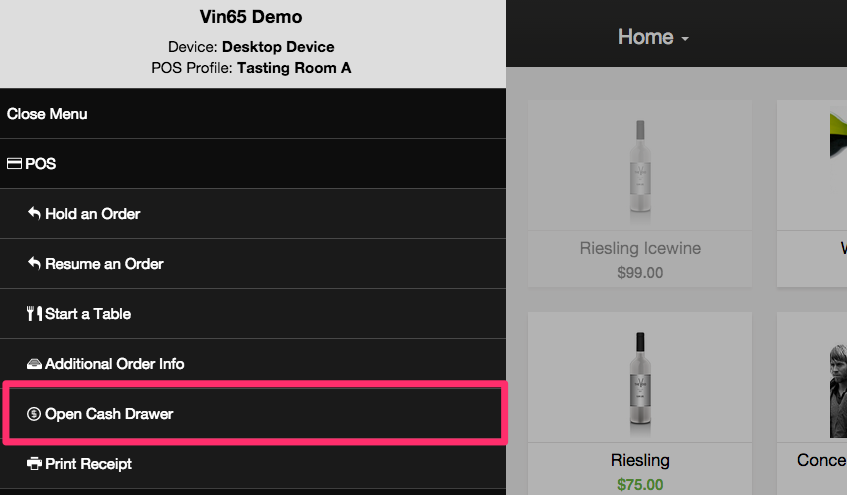
If you want to test your cash drawer, you can open it without putting in an order (note that this will only work once per POS session. If you want to do it multiple times, you'll need to reload your POS after each test, or put through an order). To do this, click on the POS menu button, then click on Open Cash Drawer show below.
You will need to print the pop-up receipt in order to open the cash drawer. If the cash drawer does not open, but the receipt prints, and you have followed up the setup instructions above, you may need to contact Star support.