- News Release
February 22, 2019 | Carly Imhof
New: Improved Bottle Deposit Features
You can use our bottle deposit feature to help manage the monetary deposits collected on beverage containers, which are required in most Canadian provinces. We've been working hard to improve this tool for you and new updates are now live. Key benefits of the changes include:
- Variable Deposit Amounts: Deposits are now configured based on bottle size and your winery's location.
- Bolstered Compliance: You can be sure your winery is charging the right deposits according to your province or state.
- Works With Bundles: Any bottles added to a bundle will automatically have the correct bottle deposit charged.
- Customizable Shipping Deposits: You can configure which provinces you want to charge bottle deposits to via the state profile setup when shipping wines.
- No Manual Adjustments: Bottle deposits will be automatically removed from $0 bottles when the bottle cost is $0 following a promo or a price override.
To turn bottle deposit functionality on, someone at your winery with developer permissions or a domain admin can navigate to Settings > Website Settings > Store > State Profile > and check the box marked Bottle Deposit. This will activate bottle deposits for pickup orders, and allow you to turn on bottle deposits for shipping orders by following the next step.
Once you've activated bottle deposit functionality, anyone with State Profile access (including basic admins) can turn on bottle deposits for shipping orders by navigating to Store > State Profile > Select the State/Province > Edit Wines. Check the box marked "Charge on Shipped Wine," like this:
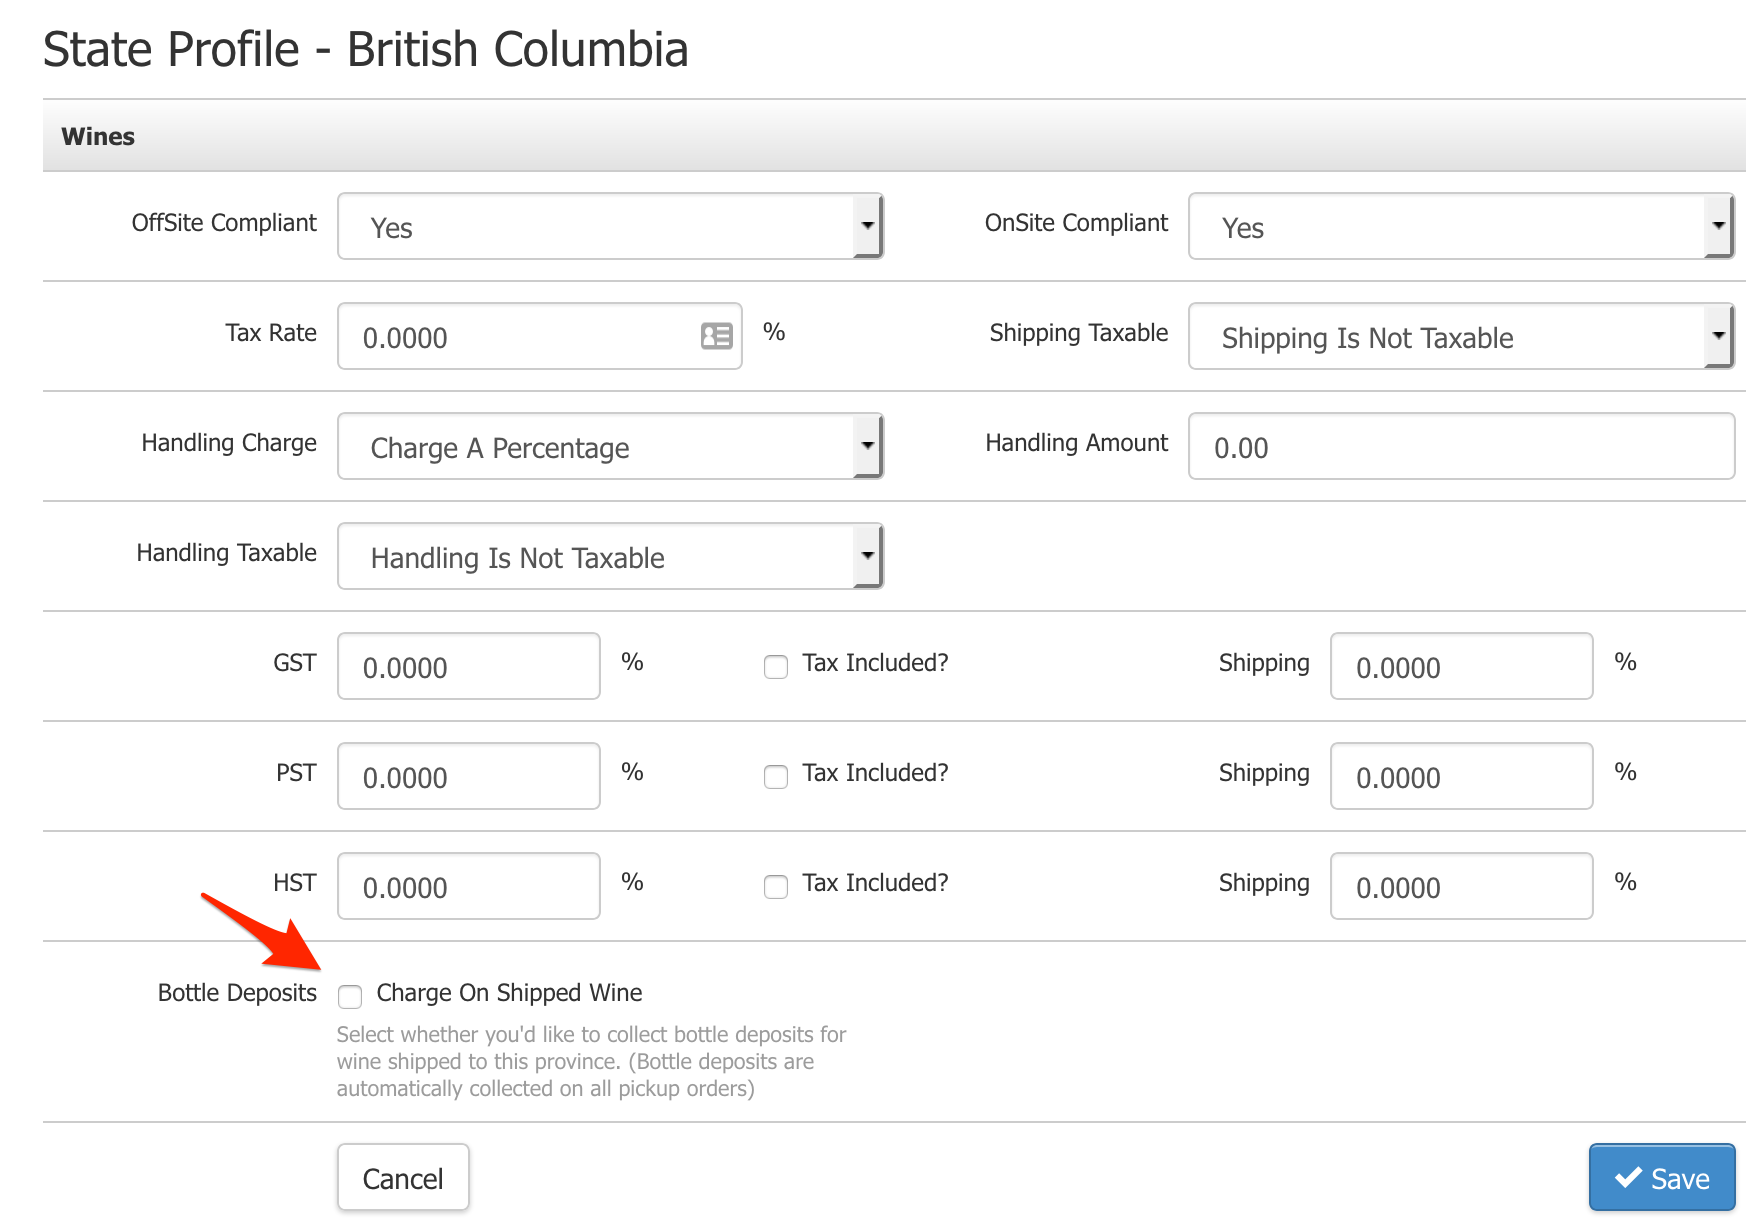
You can work more smoothly and efficiently thanks to these enhancements. We hope you love the updates!
> Read the documentation on Bottle Deposits here.
February 4, 2019 | Carly Imhof
Now: Edit & Capture Information in Corporate Order Imports
You can now easily edit corporate order information and import more order fields using our Corporate Order Importer. This tool is designed to simplify order processing for large corporate orders shipping to different addresses. Your client will only billed once for the sum total of all the orders, even if their orders include different products and are shipping to different destinations.
By popular demand, you can now import and batch edit a number of new fields using the Corporate Order Importer, including:
- Order Type
- Sale Type
- Campaign
- Sales Associate
- Sales Attribute
- Source Code
Here's what the fields look like:
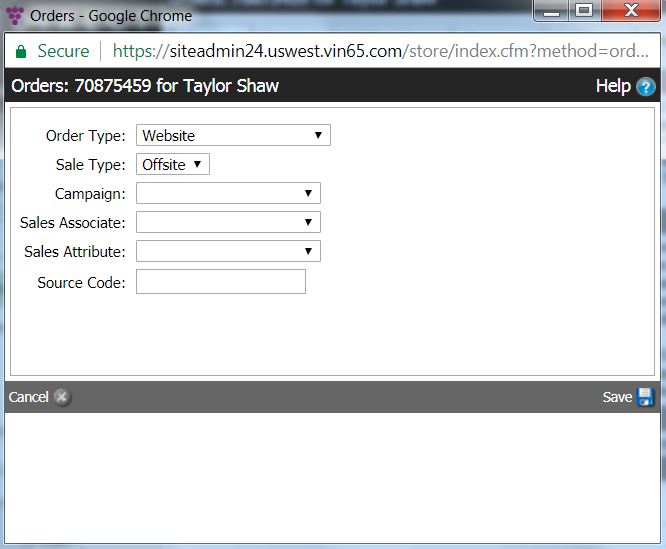
These new import fields increase the visibility of important information such as who rung in corporate orders. You can also save a great deal of time and work through the new batch editing functionality, which eliminates the need to edit orders one by one after uploading a corporate order spreadsheet.
> Read the documentation on our Corporate Order Importer
January 17, 2019 | Carly Imhof
New: Time-Saving Features
To help your winery start 2019 off on the right foot, we've made a number of improvements to our platform. These include the ability to duplicate events, create non-taxable contacts and orders in the POS, and view order type on admin order confirmations. These new enhancements, which you've requested frequently through WineDirect Ideas and in conversations with our team, help eliminate extra steps and free up time for you to focus on your business.
To duplicate an event, simply click the Duplicate button of any event you want to clone. All the information will be copied over to the duplicate. The word "copy" will be appended to the new event, which you can rename as needed. See below:
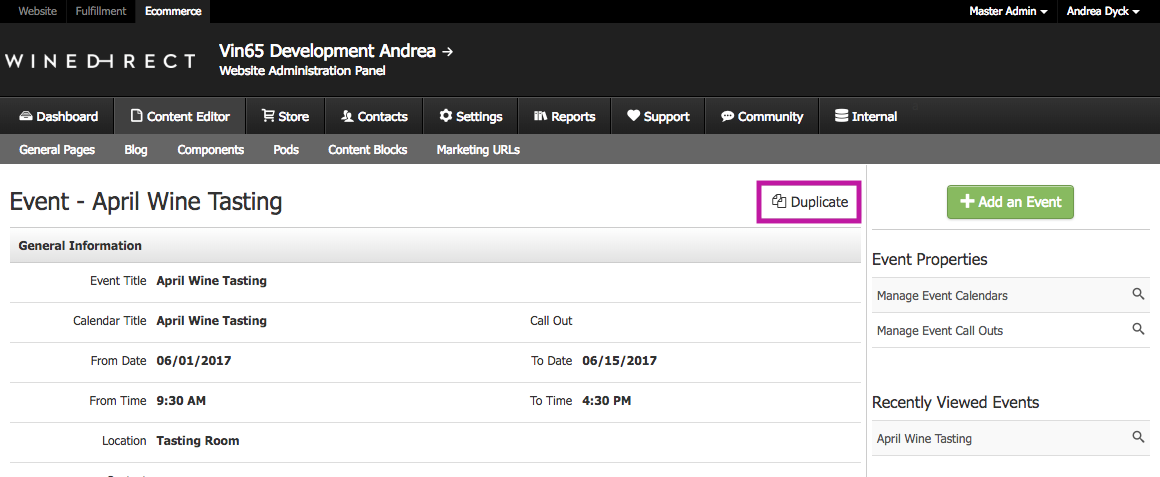
By default, duplicates will be set as Inactive. Make sure to activate them when ready!
> Check out the documentation here.
Another handy improvement is the ability to create non-taxable contacts and orders in the POS. This eliminates the need to set up a non-taxable profile in the Admin Panel before accessing it via POS. To do this, start by enabling the non-taxable settings for your POS profile. Here's how:
- In the Admin Panel, navigate to Settings > POS Profile
- Select the POS profile you wish to edit, or add a new one from the left hand menu
- Scroll down to Additional Options in the form and check Non Taxable Setting
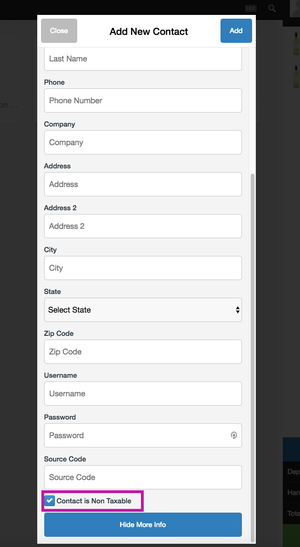
- Once this boxed is checked, you can:
- Make a contact non-taxable via the checkbox in their contact form
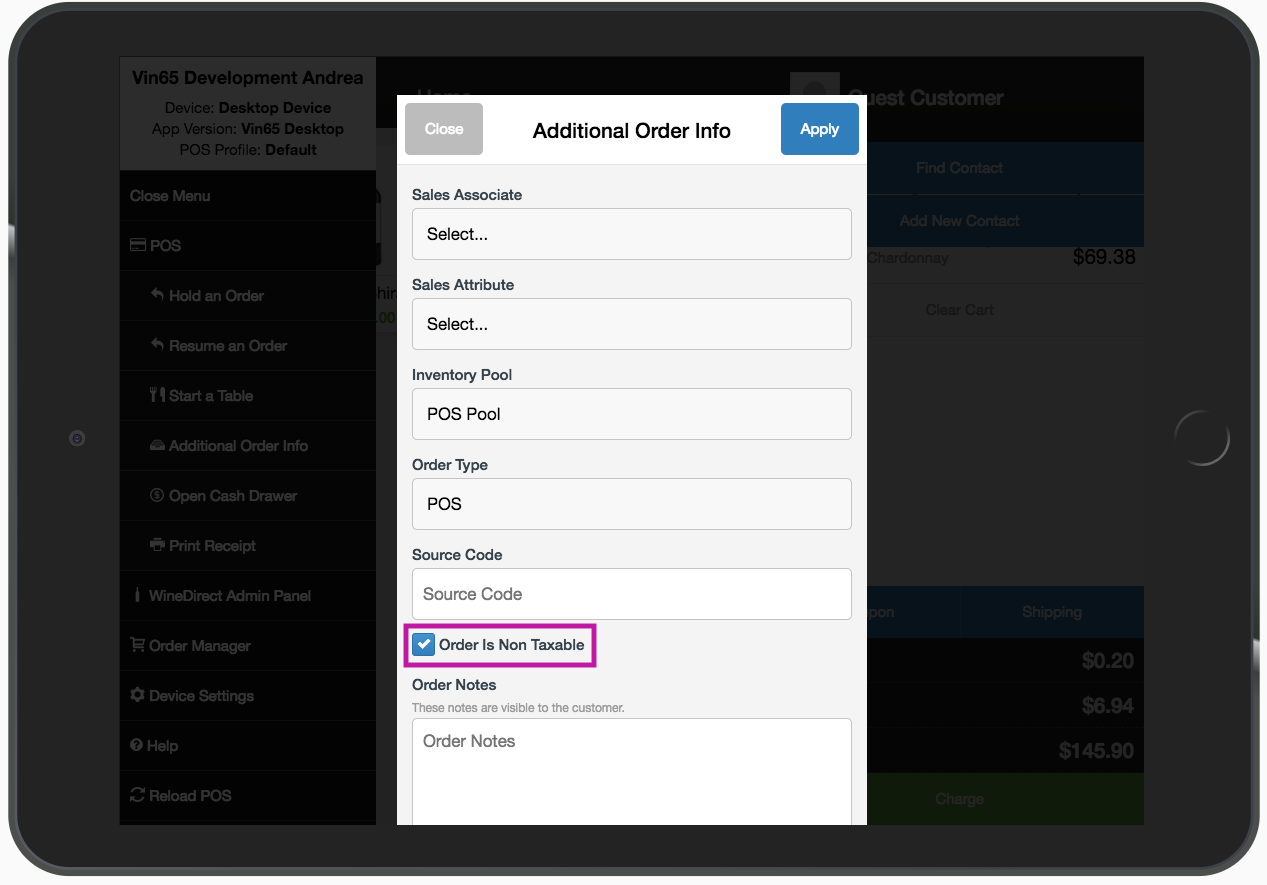
- Make an order non-taxable via the checkbox in the order form
Here's what the checkbox field looks like for a contact:
Here's what the checkbox field looks like for an order:
> Read the full documentation here.
View Order Type on Admin Order Confirmations
You can now view order type on admin order confirmations, saving you the time it would take to look up the order type manually. Simply check below the payment information on admin order notifications, and you'll find the order type listed.
January 17, 2019 | Carly Imhof
New: Email Feature Improvements
As part of our New Year's gift to you, we're rolling out much-anticipated improvements to our email tools. We've learned from numerous conversations with you and through your suggestions submitted via WineDirect Ideas that there are a number of important email tools that can make your lives easier. Some of the most often requested features are the ability to duplicate emails and the ability to separate an email's Subject Line and its internal Email Name. As of today, you can do both!
Duplicate an Email
To duplicate an email, simply navigate to any email you wish to clone, and click the Duplicate button to the right of the email name, like this:

Here are the fields that will be duplicated:
- Email Name
- From Name
- From Email
- Subject Line
- Email Category
- Content
When your email is duplicated, the word "copy" will be appended to the end of the new document's Email Name and Subject Line. You can change these names when you work on the newly created email. You can also adjust the Email Category as needed.
> Read the documentation on duplicating emails here.
Create Separate Subject Lines and Internal Email Names
Another highly anticipated enhancement is the ability to create separate names for an email's Subject Line and its internal Email Name. This makes emails easier to search for, and allows you more flexibility in how you identify emails internally versus how they're presented to your customers.
To set up a new email:
- Go to Contacts > Email Documents
- Click Add An Email Document.
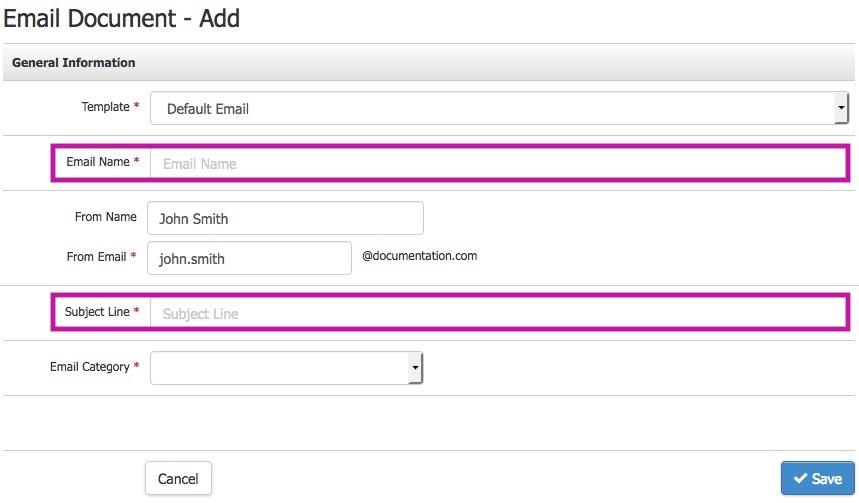
- You'll now see that the General Information section has two separate fields for Subject Line and Email Name:
> Read the documentation on setting up Email Name and Subject Line here.
January 17, 2019 | Carly Imhof
New: Email Feature Improvements
As part of our New Year's gift to you, we're rolling out much-anticipated improvements to our email tools. We've learned from numerous conversations with you and through your suggestions submitted via WineDirect Ideas that there are a number of important email tools that can make your lives easier. Some of the most often requested features are the ability to duplicate emails and the ability to separate an email's Subject Line and its internal Email Name. As of today, you can do both!
Duplicate an Email
To duplicate an email, simply navigate to any email you wish to clone, and click the Duplicate button to the right of the email name, like this:
Here are the fields that will be duplicated:
- Email Name
- From Name
- From Email
- Subject Line
- Email Category
- Content
When your email is duplicated, the word "copy" will be appended to the end of the new document's Email Name and Subject Line. You can change these names when you work on the newly created email. You can also adjust the Email Category as needed.
> Read the documentation on duplicating emails here.
Create Separate Subject Lines and Internal Email Names
Another highly anticipated enhancement is the ability to create separate names for an email's Subject Line and its internal Email Name. This makes emails easier to search for, and allows you more flexibility in how you identify emails internally versus how they're presented to your customers.
To set up a new email:
- Go to Contacts > Email Documents
- Click Add An Email Document.
- You'll now see that the General Information section has two separate fields for Subject Line and Email Name:
> Read the documentation on setting up Email Name and Subject Line here.
January 17, 2019 | Carly Imhof
New: Wine Club Feature Enhancements
Making it faster and easier for you to run your Wine Club is one of our New Year's gifts to you! Through new enhancements live today, you can now send automatic cancellation emails to club members, duplicate User Choice club seasons and view club shipments from within a contact profile.
You've requested all of these tools through WineDirect Ideas and suggested them to our team in conversations about how we can make club time as smooth as possible for you. We're thrilled to make these popular requests a reality for you. Here's how they work.
Send Club Cancellation Emails
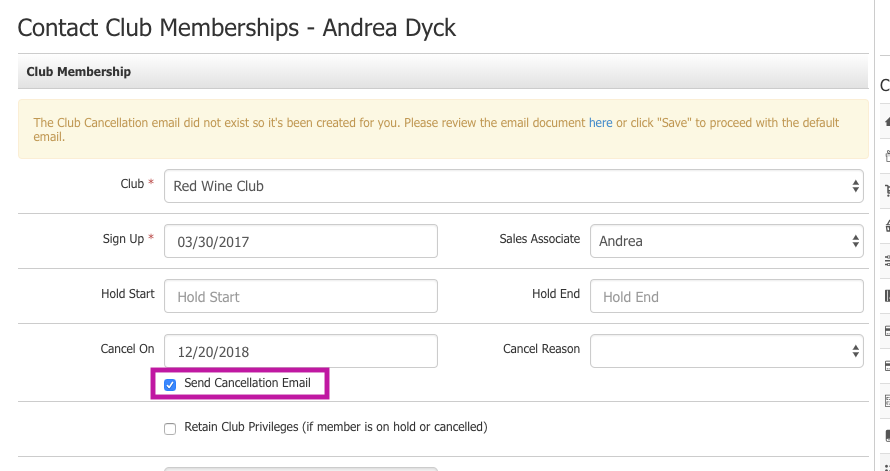
When you cancel a club member from the Admin Panel, simply check the box marked "Send Cancellation Email" to send the cancelled member their confirmation. The system will automatically generate a cancellation email for you, which you can edit as needed. Your club cancellation email template will be located in Email Documents once generated.
Here's what you'll see:
When you cancel a membership from the POS, the same box will appear for you to check as needed. However, note that a cancellation email must first be created within the Admin Panel before any cancellation emails can be sent through the POS.
> Read the documentation on club memberships here.
Duplicate Existing User Choice Club Seasons
You can now clone a User Choice club season, eliminating the need to duplicate work you've already done to set up a club.
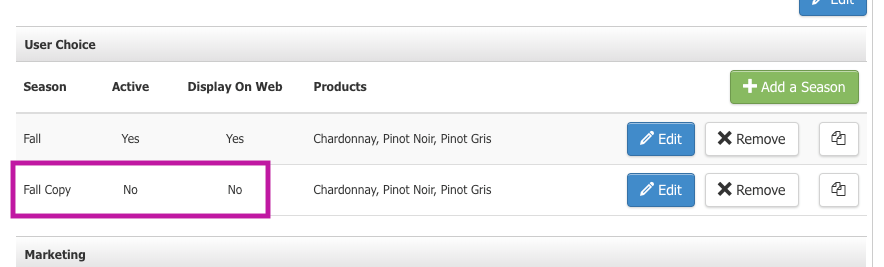
By clicking the Duplicate button from an existing User Choice club season, you'll create a new club season in which all the same information is copied over. You'll be able to identify it by the word "copy" appended at the end of the new club season's name. It won't be active or display on the web until you're ready to set it live. The default settings will look like this, ready for you to make edits:
> Read the documentation here.
View Shipments from a Contact Profile
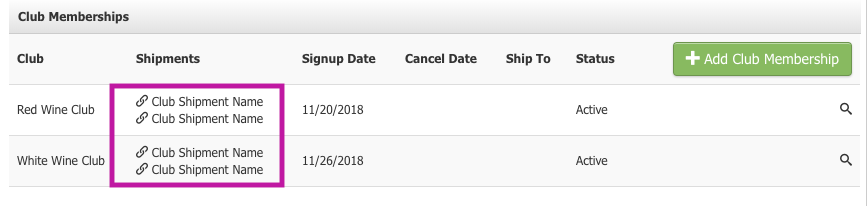
You can now access information about a club member's three most recent, active shipments - including upcoming shipments - directly from their contact profile. This means you no longer have to navigate away from a customer profile to the Club section to access and process a member's shipment!
Here's how it works:
- From within a contact profile, navigate to Club Memberships
- You'll see a new column called Shipments
- Click the link next to any shipment
- You'll be directed to the Club Members tab of the shipment you clicked on
- From here, you can process your club member's order immediately
Here's what you'll see within the contact profile:
> Check out the documentation on viewing shipments from contact profiles here.
January 17, 2019 | Carly Imhof
New: Updates to Your Promo Tools
A few of our New Year's gifts to you are designed to make your Promos more effective. We've heard from you through WineDirect Ideas and in our conversations that being able to duplicate Promos and more easily couple active Promos would help you work more efficiently. You can now accomplish both!
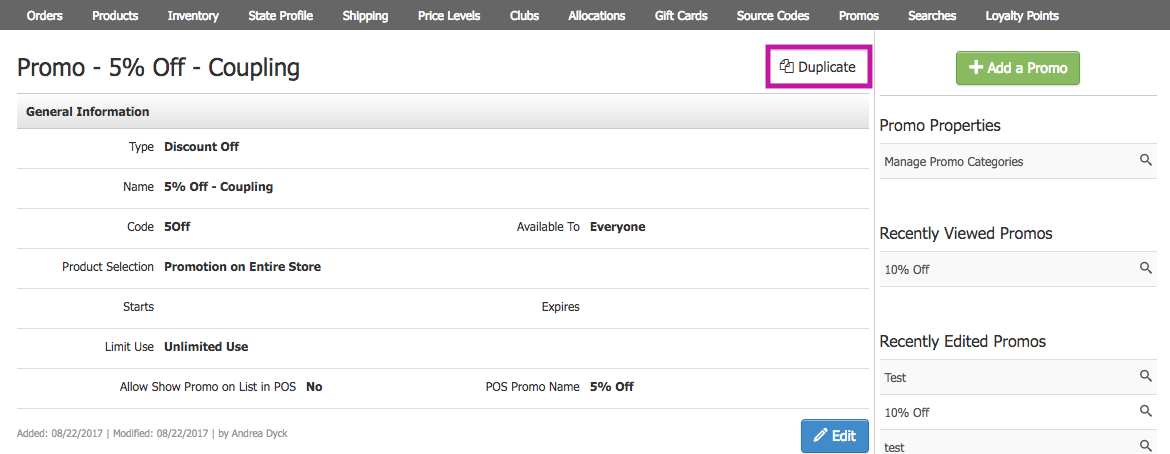
Duplicate a Promo
You must configure a number of settings when creating a Promo, which is why the ability to clone a Promo that's already set up is so helpful.
To duplicate a promo, navigate to the Promos section in the Store and select the Promo you want to clone. Clicking the Duplicate button will generate a copy of the Promo:
All of the original Promo's information will be copied over to the new one, including:
- General Information
- Excluded Products
- Included Products
- Discount
- Categories
- Order Types
- Shipping Types
- Coupling
Note that when the new Promo is created, a random code will be generated so that it can't be used until you're ready. You can edit or remove the code as desired in the General Information section of the Promo.
> Read the documentation on duplicating promos here.
Couple Promos More Easily
You can apply multiple promotions at the same time if a customer meets qualifications for both, by coupling Promos. Our latest Promo enhancements make this process easier, allowing you to see exactly which Promos are active and upcoming, so you know which Promos to choose from when coupling. Previously, all promos - regardless of active versus expired status - would display in your menu.
Now, you'll see all active promos by default, as well as any promos with a future start date. You can view expired promos as needed with a single click:
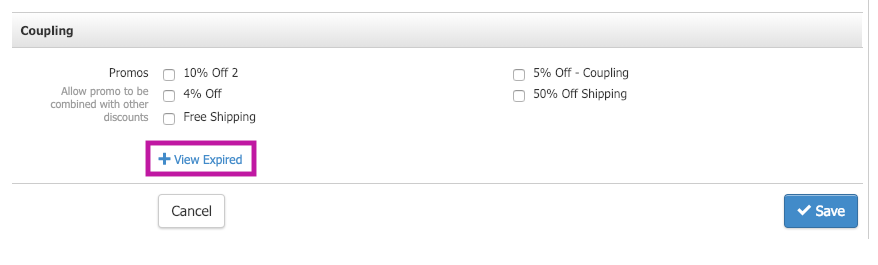
Note: If you have existing coupled Promos that include any expired Promos, no need to worry about them becoming uncoupled with this update.
Check out the documentation on coupling here.
October 10, 2018 | Katrina Sohriakoff
New: WineDirect Payments
Starting today, WineDirect clients can leverage our new integrated payments solution. From automatic credit card updates to custom gift cards, we make payment processing as painless as possible.
Benefits include:
- Exclusive features such as Automatic Credit Card Updating, Same Day Refunds on POS, and the EMV terminal (coming soon).
- Top-notch customer service, available 24/7 from a team with deep experience with the wine industry.
- Enhanced security, complete PCI compliance and $100,000 in protection against a data breach.
- Easy setup: All WineDirect clients are pre-approved for processing, and setup generally takes only a day.
- Competitive rates and discounts on tasting room hardware.
Seamlessly integrated with the rest of our offerings in the US and Canada, WineDirect Payments is the latest addition to our toolkit to help your winery achieve DTC success.
October 4, 2018 | Carly Imhof
Now: Automatically Assign Shipping Status to Refunded POS Orders
In the POS, you can now adjust your settings to automatically mark fully refunded orders as No Shipping Required and partial refunds as Picked Up. Many of you have requested this enhancement, so we are excited to improve your experience on our platform! This update eliminates the need to manually search for an order and adjust its shipping status after performing a full or partial refund.
You can adjust your settings by navigating to Store > Settings > POS Profiles. When you click on a POS profile, you'll see a new Refunded Orders section with two checkboxes. Here's what it looks like:
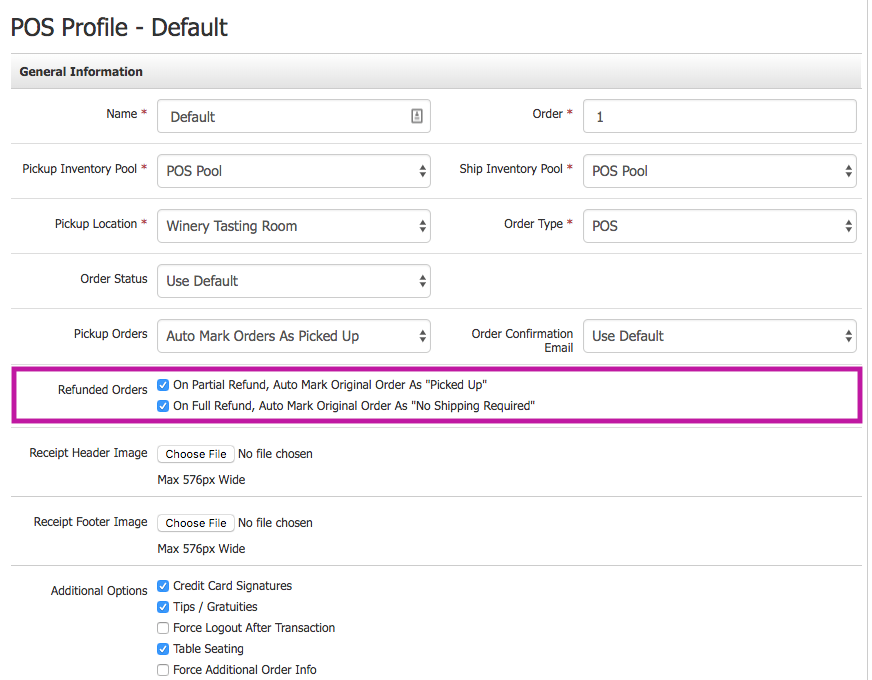
To automatically mark all orders involving a partial refund as Picked Up, simply check the box labeled On Partial Refund, Auto Mark Original Order as "Picked Up."
- Example of a partial refund: A customer buys two bottles, but decides to return one. The customer can just return the wine or can exchange for a different wine. The refund on the original order is considered a partial refund.
To automatically mark all full refunds as No Shipping Required, check the box labeled On Full Refund, Auto Mark Original Order as "No Shipping Required."
- Example of a full refund: A customer returns all bottles purchased, or exchanges all bottles purchased for different wines. In both cases, the original order is fully refunded.
Note: You only need to adjust these settings for exisiting POS profiles. All newly created POS profiles will have both checkboxes selected by default. You can always uncheck them if desired!
September 19, 2018 | Carly Imhof
New: Pickup Order Exchanges & Improved Refund Workflow
You can now easily exchange items within pickup orders through our updated refund workflow. Many of our customers have requested a more seamless process for refunds and exchanges, so we are thrilled to share these new improvements to both the Admin Panel and POS!
The updates make it easier to switch out wines or refund an order when a customer changes their mind after their pickup or carry out order has been processed.
Here are the benefits:
- Simplify your workflow by exchanging pickup order items and charging/refunding the balance.
- Provide a better guest experience with fewer credit card charges and transactional emails for your customers.
- Reduce transaction times for both you and your customers.
The pickup order exchange process is seamlessly integrated into the refund workflow. Here's how it works:
- Choose to refund a full order with just one click, or refund a specific item.
- Add new items after a refund/return is performed.
- Easily execute $0 refunds/exchanges.
You can take advantage of these features beginning September 24th, when they automatically go live for all WineDirect clients. Shipping orders are not currently eligible for exchanges.
Learn how to use the Admin Panel's refund and exchange tools in this quick video:
> Read the full documentation on Admin Panel exchanges.
Learn how to use the POS refund and exchange tools here:
> Read the full documentation on POS exchanges.
Tell us what you think of the improvements when you have a moment!