- Settings
- Import/Export
- Order Importer
Order Importer
PC users: Excel files must be saved in .xls format (excel workbook).
Mac users: Excel files must be saved in .xlsx format (excel workbook)
Mac users: Excel files must be saved in .xlsx format (excel workbook)
The Order Importer allows you to create a number of orders at one time using an Excel import sheet. These will create new live orders, this option is not for orders that have already been processed in a POS system. The Order Importer is useful for: a customer who wishes to send the same order to a number of different individuals, importing a list of trade show orders, or a list of orders by a sales rep. Please watch the tutorial video or read the following text to learn more about the Order Importer tool.
Download Sample File: Learn about using our sample files for your order import. Learn More >
Filling out the Sample File: Learn how to correctly fill out the sample file. Learn More >
Import Excel File: Learn how to import the sample file into your admin panel. Learn More >
Processing Your Orders: Learn how to process your imported orders. Learn More >
Download Sample File
Before you can Import your orders you will have to fill out the Order Importer Sample File so that your orders are in the correct formatting for import.
1. Navigate to the Settings > Import/Export > Order Importer.
2. Click Import Orders from the left navigation.
3. Click Download Sample File to open the sample sheet in Excel. Simply save the file to your computer and you’re ready to go.
Filling Out The Sample File
Below is a table with all of the column headers that you will see and the information that should be inputted.
|
BillCustomerNumber
|
Customer number for the billing contact. Not required. |
|---|---|
|
BillBirthDate
|
The birthdate of the billing contact. Format is in: MM/DD/YYYY. |
|
BillFirstName
|
Customer first name. |
|
BillLastName
|
Customer last name. |
|
BillCompany
|
Name of company order is being billed to. |
|
BillAddress
|
Primary line for billing address. |
|
BillAddress2
|
Second line for billing address. |
|
BillCity
|
Billing customer city |
|
BillStateCode
|
The two-digit state code. For example, California = CA |
|
BillZipCode
|
Billing customer ZipCode |
|
BillPhone
|
Customer phone number |
|
BillEmail
|
Customer email address |
|
isPickup
|
Indicates whether the order is a pickup order or a shipping order. Format is in: 0 = not pickup and 1 = pickup. |
|
PickupLocationCode
|
This is the code attached to your pickup location. Typically this is 'Default' if you have not changed the code when setting up your pickup location. |
|
ShipBirthDate
|
The birthdate of the recipient. Format is in: MM/DD/YYYY. |
|
ShipFirstName
|
Recipient first name. |
|
ShipLastName
|
Recipient last name. |
|
ShipCompany
|
Name of company order is being shipped to (optional). |
|
ShipAddress
|
Recipient's address. |
|
ShipAddress2
|
Second line for shipping address. |
|
ShipCity
|
Recipient's city. |
|
ShipStateCode
|
Recipient two-digit state code. E.g. CA, TX., etc. |
|
ShipZipCode
|
Recipient Zip Code. |
|
ShipPhone
|
Recipient phone number. |
|
ShipEmail
|
Email address for the recipient. |
|
SourceCode
|
Referral source code. |
|
PaymentType
|
CreditCard or Cheque. |
|
CardType
|
Credit card type. E.g. Visa, MasterCard, etc. |
|
CardNumber
|
Credit card number. Must be in 'text' format or else excel will convert to scientific notation. |
|
ExpiryMo
|
Credit card expiry month |
|
ExpiryYr
|
Credit card expiry year |
|
OrderNotes
|
Order fulfillment notes. |
|
GiftMessage
|
Order gift message |
|
SKU(1-36)
|
SKU must match an existing SKU in WineDirect |
|
SKU(1-36)Qty
|
Quantity for each SKU. E.g. 1, 2, 3. NOT 'one' 'two'. |
|
SKU(1-36)UnitPrice
|
The price for your products. You must build any discount into this price.
|
Import Excel File
1. Navigate to the Settings Tab > Import/Export > Order Importer.
2. Click Import Orders on the left of your screen.
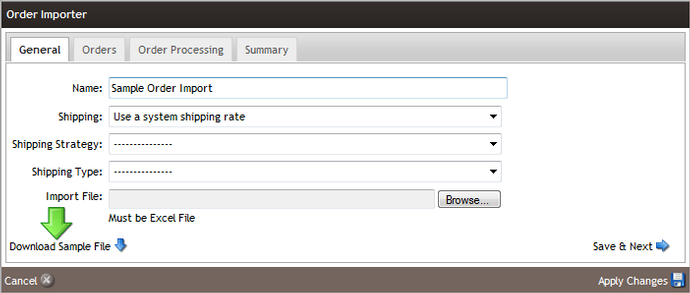
3. On the General tab you will want to fill in the following order information:
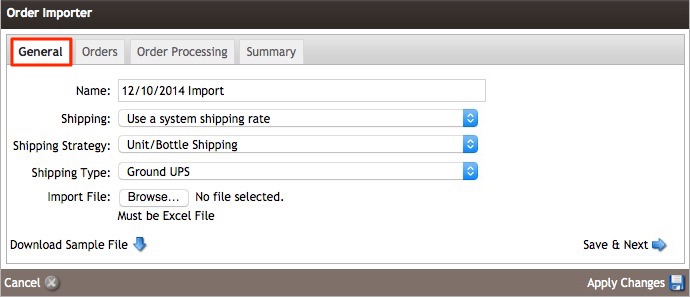
| Name | The name of you import. If you do not change the name the import name will default the the import date. |
|---|---|
| Shipping |
The shipping rate structure to be used for all orders. Either assign one flat rate or let your shipping table choose the appropriate rate based on the shipping address for the order.
|
| Shipping Strategy | Select your shipping strategy. Doing so will allow you to select a shipping type from that strategy. |
| Shipping Type | Select the shipping type (carrier) for all of the orders. |
4. Click the Browse button. This will allow you to browse your computer for your Excel order file. Select the file you wish to import.
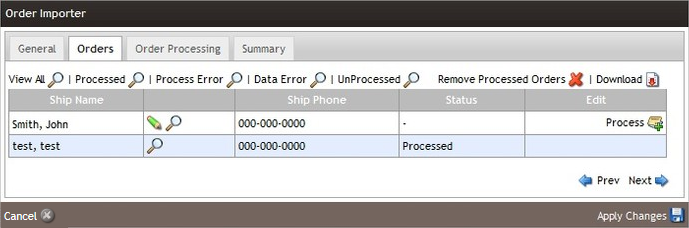
5. Click Save & Next. This will take you to the Orders Tab. The Orders Tab allows you to view all the imported orders from your list. If there are any issues with any of the fields in your Excel sheet, you will be notified in red of the fields that need to be addressed. You can edit any of the order information by clicking the Pencil next to the order you wish to edit. You will also be able to process orders individually, and clean/sort your list based on statuses of the orders. Once your order information is correct and ready to be processed you can click next.
Processing Your Orders
1. The Order Processing Tab will allow you to process the orders in your list. You will be notified of the number of orders that are available for processing. Any orders that were processed individually on the Orders Tab will not be processed again. Click Process All Non-Processed Orders to process your list.
Once an order is processed it becomes a live order, charges the customer's credit card, and sends the customer an order confirmation email.
2. The Summary Tab allows you to view the stats on your list, including any errors or unprocessed orders.