- Settings
- Website Editor
- Checkout Design / Enable the Latest Checkout Tools
Using Checkout Design to Enable the Latest Checkout Tools
The Checkout Design tool allows you enable the latest checkout tools and even allows you to adjust the look and feel of your ecommerce cart and checkout pages to better fit your branding.
How To Customize Your Checkout: Learn how to edit the fonts and colors for your checkout pages. Learn More >
How To Preview Your Checkout: Learn how to preview your checkout before setting it live. Learn More >
How To Publish Your Changes and Enable the New Version of Checkout: Learn how to publish your checkout, setting it live. Learn More >
Why Enable The Modern Checkout: Learn about the benefits of the modern checkout. Learn More >
3DS: 3DS 2.0 is one of the many benefits offered by the v2 Checkout. Learn More >
FAQs: Read our frequently asked questions. Learn More >
How To Customize Your Checkout
Navigate to Settings > Website Editor > Website Properties > Checkout Design and you will see a variety of fields where you can edit the logo for, and styles of, your checkout, ranging from the background color to the button colors.
Not seeing the Checkout Design? You must be a Domain Admin to access Checkout Design. You may want to confirm your secuity permissions in order to proceed.
Making Changes in the Checkout Design
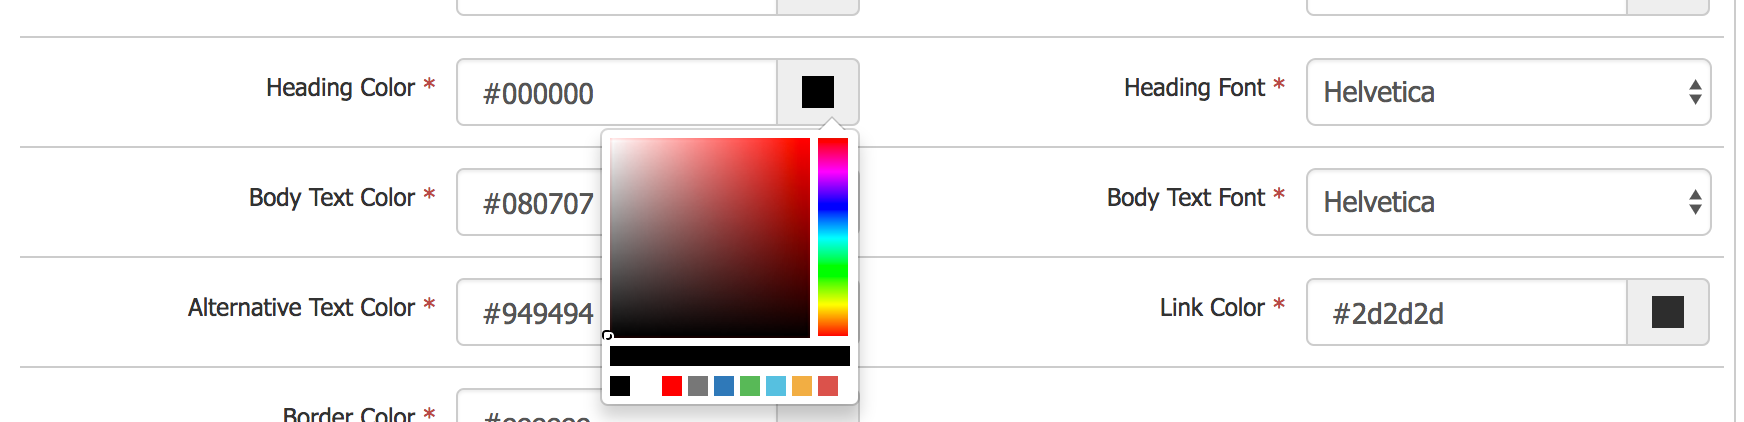
1. Select the fonts that best match your branding. We allow you to choose from hundreds of Google Fonts.
2. Choose any colors that you'd like for the buttons, background and fonts.
For any color selections, you can click on the square color preview to reveal a color picker. If you know the exact hex code that you want, you can also type that directly into the input. (A hex code is a combination of 6 digits used to represent colors.)
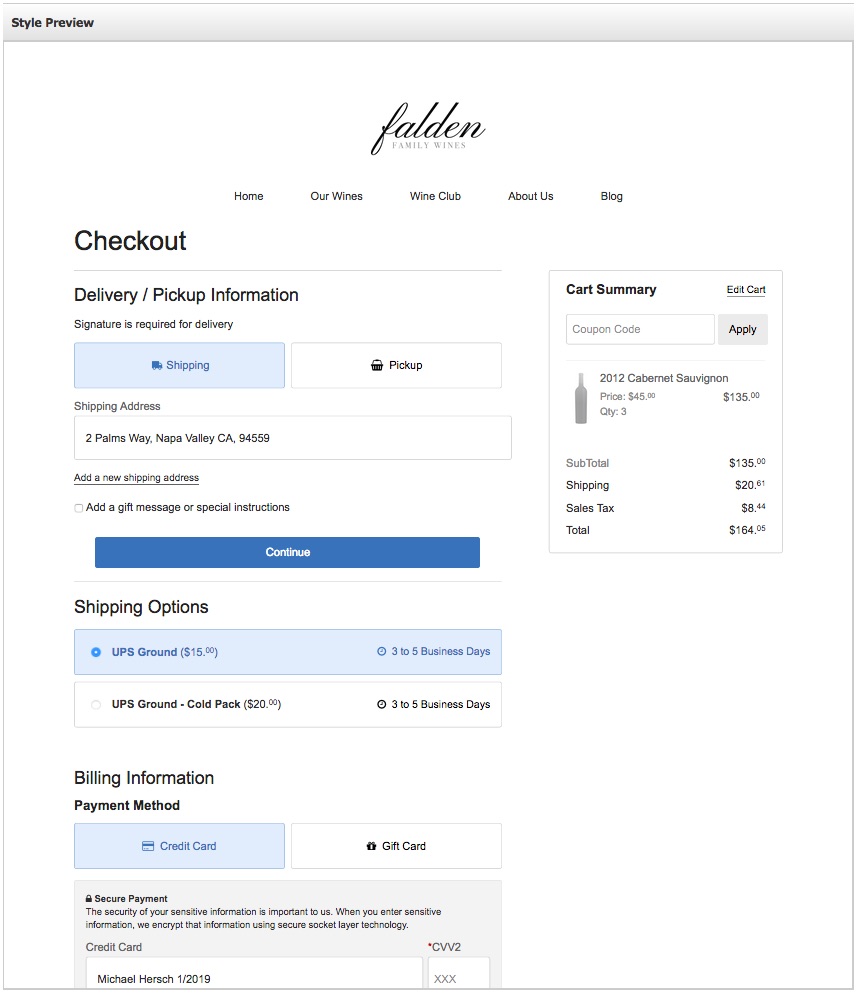
3. While you make changes, there is also a Preview Styles area that allows you to quickly see the updates you are making without visiting your website.
(Want to preview the checkout directly on your site? Learn more here.)
Learn More About What You are Editing
| Page Background Color | Color used for the background area surrounding your checkout content. |
|---|---|
|
Content Background Color |
Color used for the background of your page content. Tips for when adjusting this setting:
|
| Header Background Color | Background color used in the header section of Checkout page |
| Main Menu Color | Color used for the main header on cart and receipt pages (checkout/club signup pages do not include a menu). |
| Footer Background Color | Background color used in the footer section of Checkout page |
| Footer Menu Color | Color used for the footer on cart and receipt pages (checkout/club signup pages do not include a menu). |
| Heading Color | Color used for all headings throughout the checkout process. |
| Heading Font | Font used on titles. Current options include: Arial, Helvetica, Tahoma, Verdana, Georgia, Palatino Linotype, and Times New Roman. |
| Body Text Color | Color used for the majority of your page content excluding the headings. (The heading color is set separately.) |
| Body Text Font | Font used for your page content excluding the headings. (The heading font is set separately.) |
| Alternative Text Color | Color used for sub-text throughout the checkout. It is primarily used for information that is important, but that we don't want to be the primary focus on the page. (This includes the order shipping and taxes, etc.) |
| Link Color | Color used on any links within the page content. |
| Border Color | Color used to frame each of the checkout steps and the order summary. |
| Primary Button Color |
The primary button color is for the button that is used for all main actions across the checkout experience. Tips for when adjusting this setting:
|
| Primary Button Text Color | Text color found on the primary button throughout checkout. |
| Secondary Button Color |
The secondary button is used for all 'optional' or less important actions across in the checkout. For example, it is used when adding a coupon or gift code to an order. Tips for when adjusting this setting:
|
| Secondary Button Text Color | Text color for the secondary button throughout checkout. |
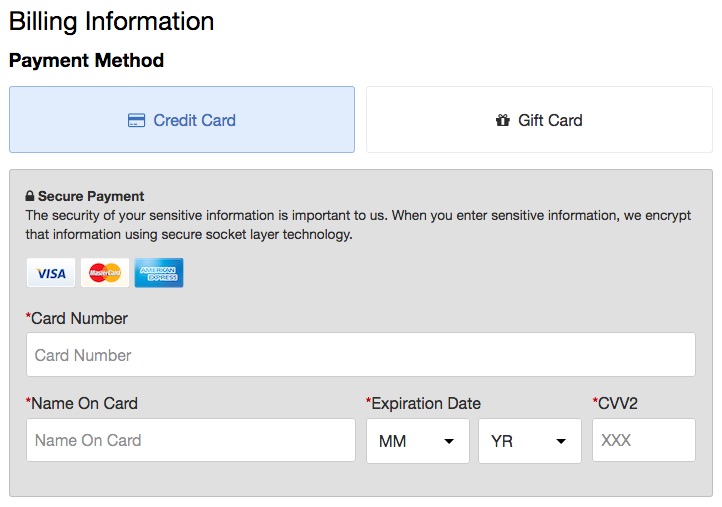
| Secure Payment Background Color |
The background section that displays around the payment method feilds. This messaging reassures customers purchasing on your site that their card information is being securely handled. Ideally this should be some sort of contrasting color to the Content Background Color so that it visually stands out to customers.
|
How To Preview Your Checkout
Please note that the option to preview is only before you have set your checkout updates live. After they have been made live, any updates made in the Checkout Design will update automatically on your site.
If you are happy with your selections, but want to take a better look at your changes, you can preview what your updates will look like on your site by clicking the Preview button.

What to Do in Preview Mode
When you are on your site in preview mode, you have the ability to go through your entire checkout process in a test environment. Any orders made in preview mode will not be saved.
You can:
- Test out your selected styles
- Play around with the new checkout features
- Add products to your cart to complete a test order
- Add a test club membership
End Preview Mode
If you are done previewing, and want to view your current checkout, click End Preview on the top notification banner. You can always re-enter preview mode again through the admin panel.

How to Publish Your New Checkout
Once you are happy with your changes, you can set your new checkout live by clicking the Publish button. Now all customers will be able to use your brand new checkout!

Why Enable the Modern Checkout?
The modern checkout flow follows ecommerce best practices in reducing abandoned carts and increasing conversions. A couple of the key improvements include:
- A brand new one-page checkout that makes it easy for a customer to complete the purchasing process for both wine clubs and products.
- Facebook Login making it easier than ever for new or existing customers to checkout. (Read more about how to enable this.)
- A beautifully responsive design that is optimized to screens of all sizes. Customers can purchase from any device!
- The ability to adjust the colors and fonts without the need to hire a designer.
- Supports PayPal Express Checkout as a payment method
WineDirect is constantly improving and refining the checkout process to increase security, conversions and help you sell more wine which all is done based on this current checkout experience and might not be available for the older checkout. By enabling the modern checkout, this will allow us to give you these updates as they become available. No additional work will be required on your end.
3DS 2.0
If you are on Checkout V2 and a customer of WineDirect Payments, you can enable 3DS 2.0 which is an additional layer of security at the payment gateway level. We strongly recommend you enable this feature due to all the benefits it confers. For more information on how to set this up, please click here
- The font doesn't match my website. Can I add more?
- Can my designer make more changes?
- How do I disable the new checkout?
- How do I enable the Facebook login?
- Is there a way to return to default values (for colors and fonts) after making changes to the Checkout Design?
- What happens if an existing Contact tries to sign in with their Facebook login?
- Is there any way for us to add additional scripts to this page?
- Does this page fully support Google Enhanced Ecommerce tracking and Google Tag Manager?
- Do Gift Memberships work on New Checkout?
The font doesn't match my website. Can I add more?
Currently, you can choose from over 900 Google Fonts so it's very easy to select a font to match your branding..
Can I get a designer to make changes to the checkout?
A designer can have the ability to edit the Header of the checkout by enabling Advanced HTML Header. Once this is enabled, two new fields will appear titled HTML and CSS. Designers can paste their CSS/HTML for the header of the checkout. If you don't have this enabled, please reach out to support@winedirect.com.
When a designer adds HTML to the HTML field, it should render in preview and live mode and replace the <header>HTML in the layouts.
When a designer adds CSS to the CSS field, it should render a <style> tag above the <header> tag in the layouts
However, designers will no longer be able to go and edit the CSS/HTML for the rest of the checkout page. This is a tradeoff that was made to ensure:
- You can benefit from research completed on the checkout process which will in turn increase your conversions
- As new features and technologies are added, you will be able to turn these on right away without worrying about breaking your current website or having to constantly pay a designer to fix display issues
If you are implementing Remote widgets, you can find the information in this link.
How do I disable my new checkout?
Although we don't recommend disabling the modern checkout, if you need to, you can click Disable in Checkout Design to revert to your old checkout. Keep in mind that by doing this you will no longer receive the benefits listed here.
How do I enable the Facebook login?
Learn how to enable Facebook login here.
Is there a way to return to default values (for colors and fonts) after making changes to the Checkout Design?
No, there isn't a way to revert back to the Default Settings
What happens if an existing Contact tries to sign in with their Facebook login?
The user is taken to an “Account Review” form, which populates with the email from Facebook. The user can change that email, and it will be used to validate if the email is in use or not. So if a user has a Facebook account currently with the same email, using Facebook login will prompt the user to confirm their email, and will error since the email entered is the same on their existing account.
Is there any way for us to add additional scripts to this page?
Currently you can only put additional scripts on the Checkout Receipt and Club Receipt pages via the receipt JS settings found under Settings > Website Settings > Custom Javascript.
Does this page fully support Google Enhanced Ecommerce tracking and Google Tag Manager?
Yes, it fully supports both these tools.
Do Gift Memberships work on New Checkout?
No, Gift Membership is currently not supported on New Checkout. If you are using the Gift Membership functionality, you will want to stay on the old Checkout at this time