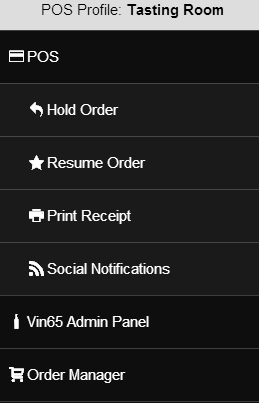
- POS
- POS Orders
POS Orders
The POS system has been designed to be simple and intuitive to allow your tasting room staff the ability to easily place orders. Products and contacts will be drawn from the same database that your website uses. While each order may be different, here are a few basic steps to placing an order on the POS system.
The video below will show you how to add an order in the POS system.
Video Keypoints:
1. 00:25 How to add POS Categories.
2. 00:36 How to assign Products to POS Categories.
3. 00:45 Placing an Order in the WineDirect POS as "Guest".
4. 02:10 Placing an Order for an existing customer.
5. 02:50 Promos in a POS Order.
6. 03:20 Adding Shipping to a POS Order.
7. 04:30 Declined Credit Card Message.
In this section you will learn about the following subjects:
1. Adding a Customer
2. Payment Methods
3. Manage Orders
4. Refund on POS
5. Hold and Resume an Order on POS
6. Quarantined Orders
Who Is The Customer?
Orders can be placed for both guests (anonymous checkouts) where you are not worried about collecting contact data or for customers who are already part of your contact database. The POS application is tied directly to your contact database, so you can look up customers and club members, plus, any promotional offers, discounts, and order history will all be shown for the correct contact record.
Guest Checkouts
The Guest Customer "name" is the default order scenario for the POS. If you do not select a specific customer (Find Contact) or collect data (Add New Contact e.g. name, email, etc.) before proceeding to the payment screen, the system will make a new contact with the first and last name of Guest Customer.

During the checkout process you will be asked to enter an email address to send a digital receipt to the customer. If you enter an email address, a customer record with the email address will be created and the order placed into the order history for the contact. This will allow you to go in and flesh out a contact record later if you gather additional information from the client on a later occasion or through paper signup sheets.
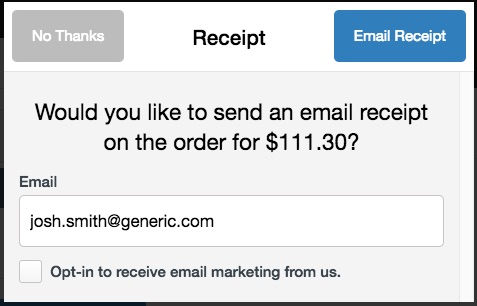
Customers who verbally opt-in to receiving marketing emails will have their contact record updated to a Single Opt-In email status. This allows you to compliantly send marketing emails to the customer. The customer will also receive a Double Opt- in email in which they can confirm their email address, allowing greater compliance for newsletter mailing list standards in different countries. For more information see Email Statuses Documentation.
If you choose not to enter an email address, then the order will be saved, but it will have the "Guest Customer" name attached.

To allow a guest checkout order to flow into integrated compliance and fulfillment systems, the address of the winery will automatically attach to the order. The address used can be created through Pickup Locations and added to the POS application through the POS Profiles section.
New Customers
If you would like to create a new contact profile before or during placing an order for a customer, click the area of the guest icon, in the upper righthand corner of the POS screen. A dropdown menu will open, then click the blue 'Add New Contact' button to add the contact's information. Contact details can be entered manually, or you can swipe a customer's drivers license to try to collect some information available on the magnetic strip.
Existing Customers/Club Members
If the customer is returning and already has a customer profile, you can look them up by clicking in the area of the guest icon, in the upper righthand corner of the POS screen. A dropdown menu will open, then click the blue "Find Contact" button. Searching for the customer by name, email or phone, will bring up a list of contacts that meet your search criteria. Click the blue Select button next to the correct contact and their name, plus additional stats will replace Guest Customer. Any order placed will now be in the order history for that contact.
Payment Methods
After selecting a customer and adding items to the cart, it's time to have the customer pay for their order.
Entering A Payment Method: Learn the different types of payments available for a POS order and how to choose them. Learn More >
Removing A Payment Method: Learn how to remove a payment method (Refund/ Return) if a customer chooses to switch payment methods or wishes to add additional items to their order. Learn More >
Entering Payment Method
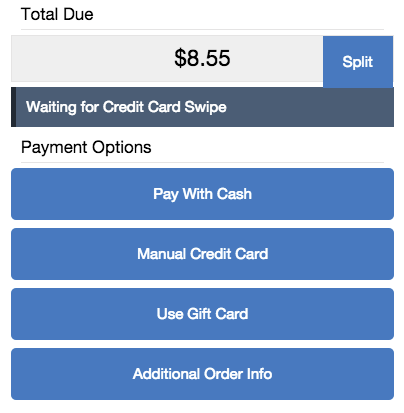
When processing an order on the Vin65 POS system you are able to capture payment in a number of methods, as well as split payments.
- Pay With Cash
- Scan Credit Card with Camera
- Enter Credit Card Manually
- Use Gift Card
- Removing a Payment Method
Below we'll discuss each of the available methods.
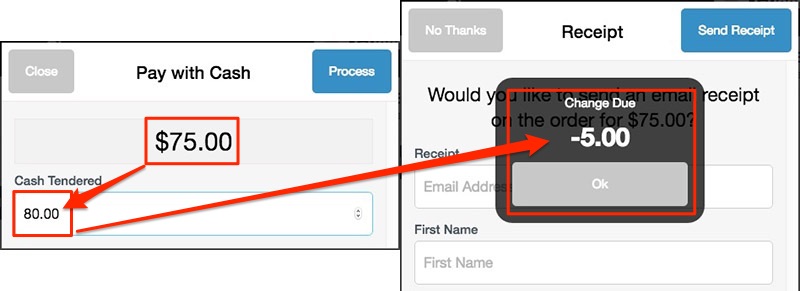
Pay With Cash
With this method all you need to do is enter in the amount tendered and received (this is the actual money received into your hand from the customer) and then you can give them the proper amount of cash back.
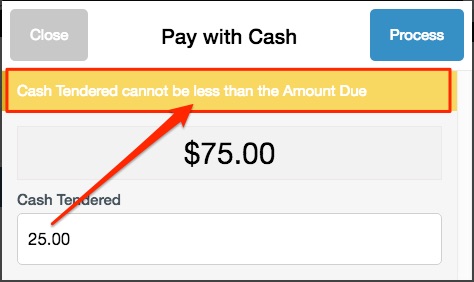
If you try to enter a sum of cash less than the amount due an onscreen error message "Cash Tendered cannot be less than the Amount Due" will prompt you to increase the cash tendered amount you are entering.
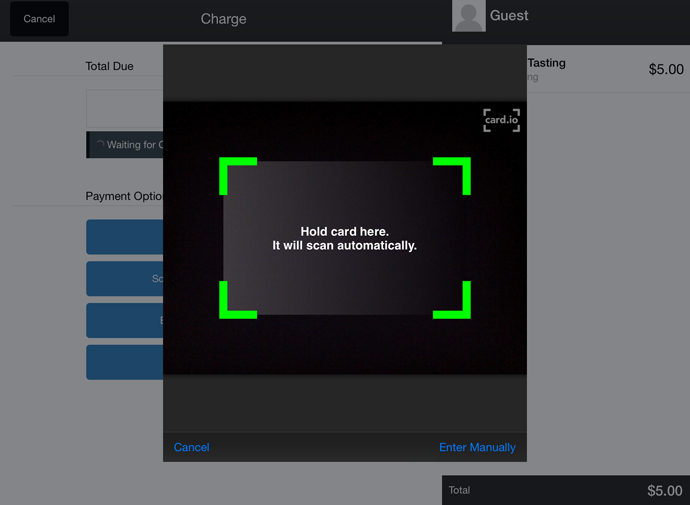
Scan Credit Card with Camera
This feature allows you to actually scan the front of the card with your iPad's camera. This allows you to process the card when it recognizes the card number and expiry date.
For security and fraud prevention purposes, the images do not connect to the internet and the images do not get saved on the iPad or on the customer record. If you are not able to access this option please make sure that your Vin65 POS app is updated on the App Store.
Enter Credit Card Manually
This payment method allows you to type in the credit card number, the expiry month, year and the CVV2 number.
Use Gift Card
When you use a Gift Card on a purchase any amount on the Gift Card gets applied to the existing order total. If the total of the Gift Card exceeds the total of the purchase, then the customer pays nothing else out of pocket and they can use the rest of the total amount of money on the Gift Card on a future purchase.
For more information please check out our Gift Card Documentation.
Removing A Payment Method
Are you at the point of the transaction where you've run in the customer's payment method(s) and then ask to switch a credit card? Or are your entering the payment in and the customer asks to add or remove items from the order? It's not too late! The information below will cover how to remove a payment method from and order, allowing you to make changes to the order.
Credit Card Payments
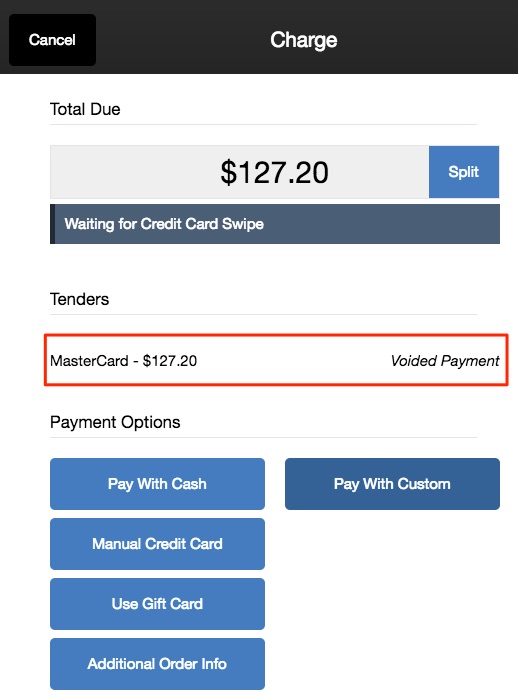
You must have the Tip and/or Signature features enabled on your POS Profile(s) if you want to have the option to void a credit card payment on an order being paid in full with a single credit card. If neither of these features are enabled, the order and payment will be processed with no option to go back.
When placing a split tender transaction you will have the option to void or remove a tender after adding each tender.
When placing a split tender transaction you will have the option to void or remove a tender after adding each tender.
If you have swiped, scanned, or manually entered the customer's credit information for the order but they have not signed, it is not too late to go back and make alterations to the order. Using the Back and Cancel buttons you can navigate back to the main payment screen, allowing you to either change the payment method or use the Cancel button on the payment screen to go back to the POS page to add or remove items from the order.
1. Depending on how far along you are in the payment process, click Back until you see the Cancel.
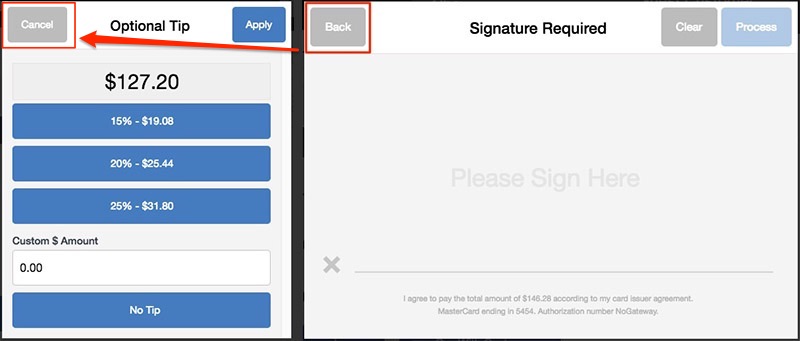
2. Clicking the cancel button on the Tips screen will trigger a Void on the credit card transaction and return you to the payment screen.
3. From the payments screen, you can now choose a different method of payment or click Cancel once more to jump back to the POS main screen to add or remove items from the order.
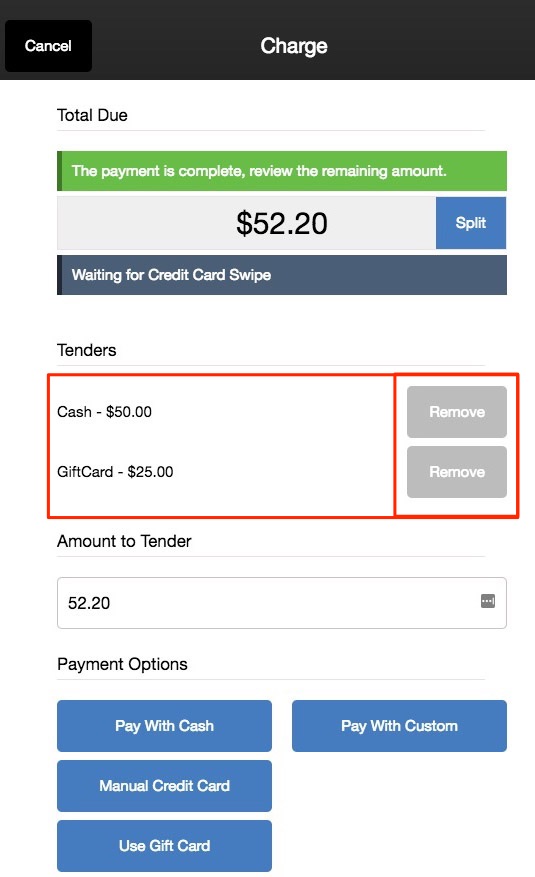
Non-Credit Card Payments (Cash, Gift Card, etc)
You can only remove a payment method (tender) on orders being paid for with multiple methods (split tenders), such as: Cash & Credit Card, Gift Card & Cash, Gift Card & Credit Card, etc. Orders that are being paid for by a single payment method will process the order and payment without the option to void or remove the payment from the checkout screens. You would need to refund the order.
When placing a split tender order you have the option to remove a payment method in between adding each of the various tenders.
1. Once a tender has been added sucessfully you can click the Remove button to remove it from the order and allow you to enter an alternative form of payment.
Manage Orders on POS
Learn how to manager your Orders in the Order Manager of the Vin65 mobile POS app. Below are tips and tricks on how to Manage your orders, Process Refunds.
1. Choose Order Manager.
2. Now in the Order Manager you can choose any order to perform an action.
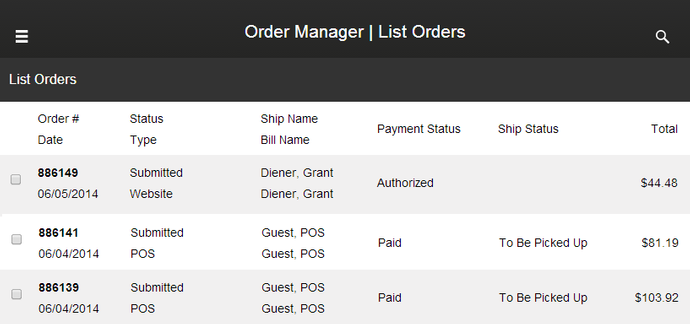
Once you press on the row of your order number you wish to perform an action on, the Actions button will appear.
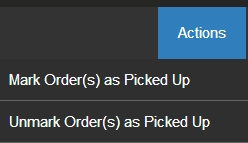
If you click on the check boxes you are also able to select multiple orders at once. When you do this the Actions button will appear. You are only to select as many orders appear on one POS screen page at a time.
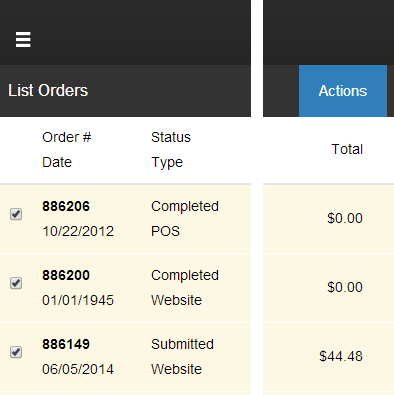
Selecting the Actions button will give you options to mark the orders as picked up or unmark them as picked up.
Refund on POS
Refunding a split tender order? Check out our split tender refund documentation.
To process a refund on the POS you can follow the below steps.
1. Open the POS application.
2. From the main menu (3 bar icon in he upper left of the screen) select Order Manager.
3. From the order list, select the order you wish to refund.
4. Click Refund Items button.
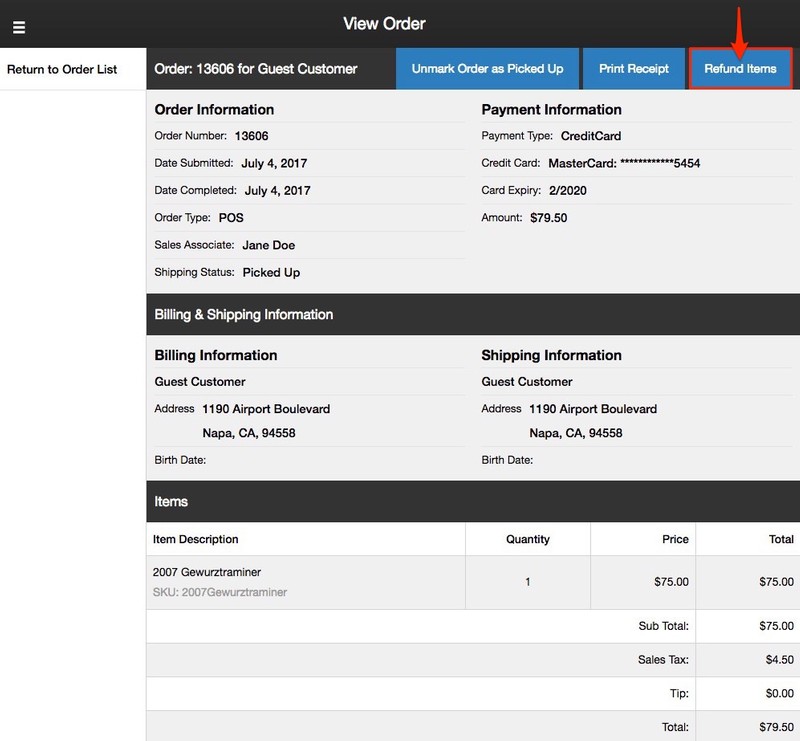
5. You will now arrive on the Refund Items screen where you can choose to refund the entire order or a portion of it. (Please note: An order can only have one refund placed against it).
By default all items, shipping, tips, handling, etc will be added to the refund allowing you to easily place a full refund order. You can also choose to edit the quantity and prices of individual items by clicking the Refund/Return buttons next to an item, which will bring up a popup item menu.
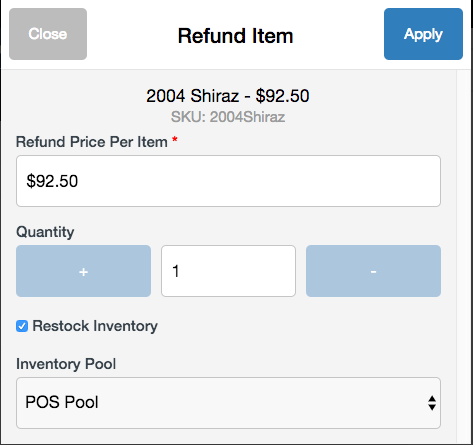
Restock Inventory determines whether Inventory will be adjusted to account for the Refund transaction.
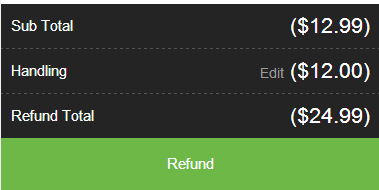
You are able to choose how much to refund on each product and on the handling and shipping charges if any apply. The taxes will automatically be calculated for each refund.
6. Once you are ready to process the refund simply press the green Refund button.
7. Here you will see the refund payments screen. Click Refund next to each of the tender and click process on the popup window.
Once the refund amount reaches ($0.00), meaning that the funds that are to be returned and the amount you are choosing to refund to payment method match, the Process Refund button will turn blue.
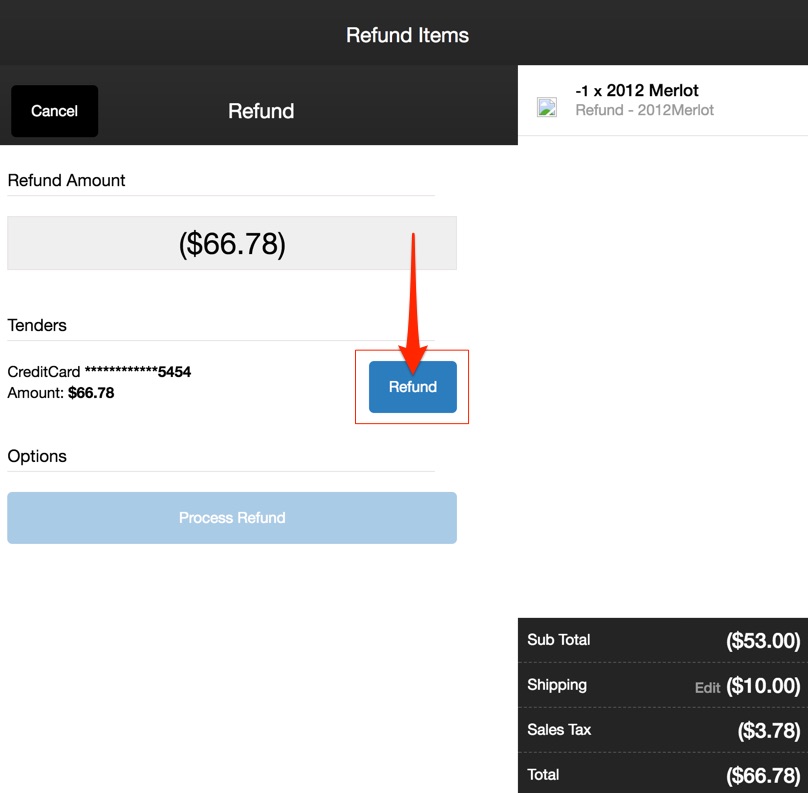
8. Click Process Refund to complete the refund process.
This will create a new order number in Vin65 and will appear as a refunded order. This process is very much the same as the Vin65 Admin Panel Partial Refund tool.
Hold/Resume An Order On POS
To place an order on hold on the POS, follow the steps:
1. Select the POS menu button on the top left corner.
2. Click Hold Order from the menu listing.
3. In the Hold Order pop-up window, input a Hold Nickname, or additionally an Email Address.
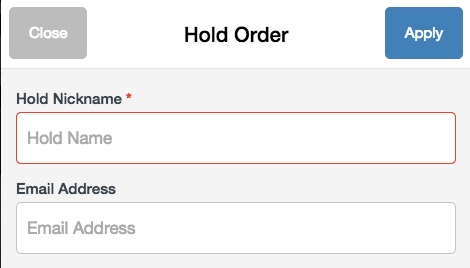
4. Click Apply to put the order on hold.
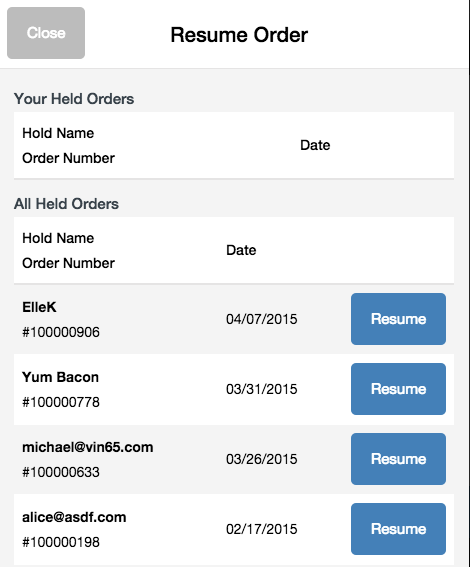
To resume an order on hold on the POS, follow the steps:
1. Select the POS menu button on the top left corner.
2. Click Resume an Order from the menu listing.
3. From the Resume Order pop-up window, select an order from either Your Held Orders, which is based off of the Sales Associate who is logged in, or All Held Orders for a complete listing, by clicking Resume next to the order.
POS Address Error Notifications (ShipCompliant Users Only)
This feature gives you the opportunity to identify and correct address errors before a customer leaves the tasting room, helping ensure more orders pass quarantine.
Quarantined orders are orders where payment has been captured but the ShipCompliant compliance check failed. It could fail for a myriad of reasons. We recommend addressing any compliance failures on Quarantine Orders as soon as possible.
With this feature, as you are going through the POS Checkout flow, as soon as the Shipping Address is entered and the user selects Charge, the POS will start attempting to verify the address with ShipCompliant immediately.
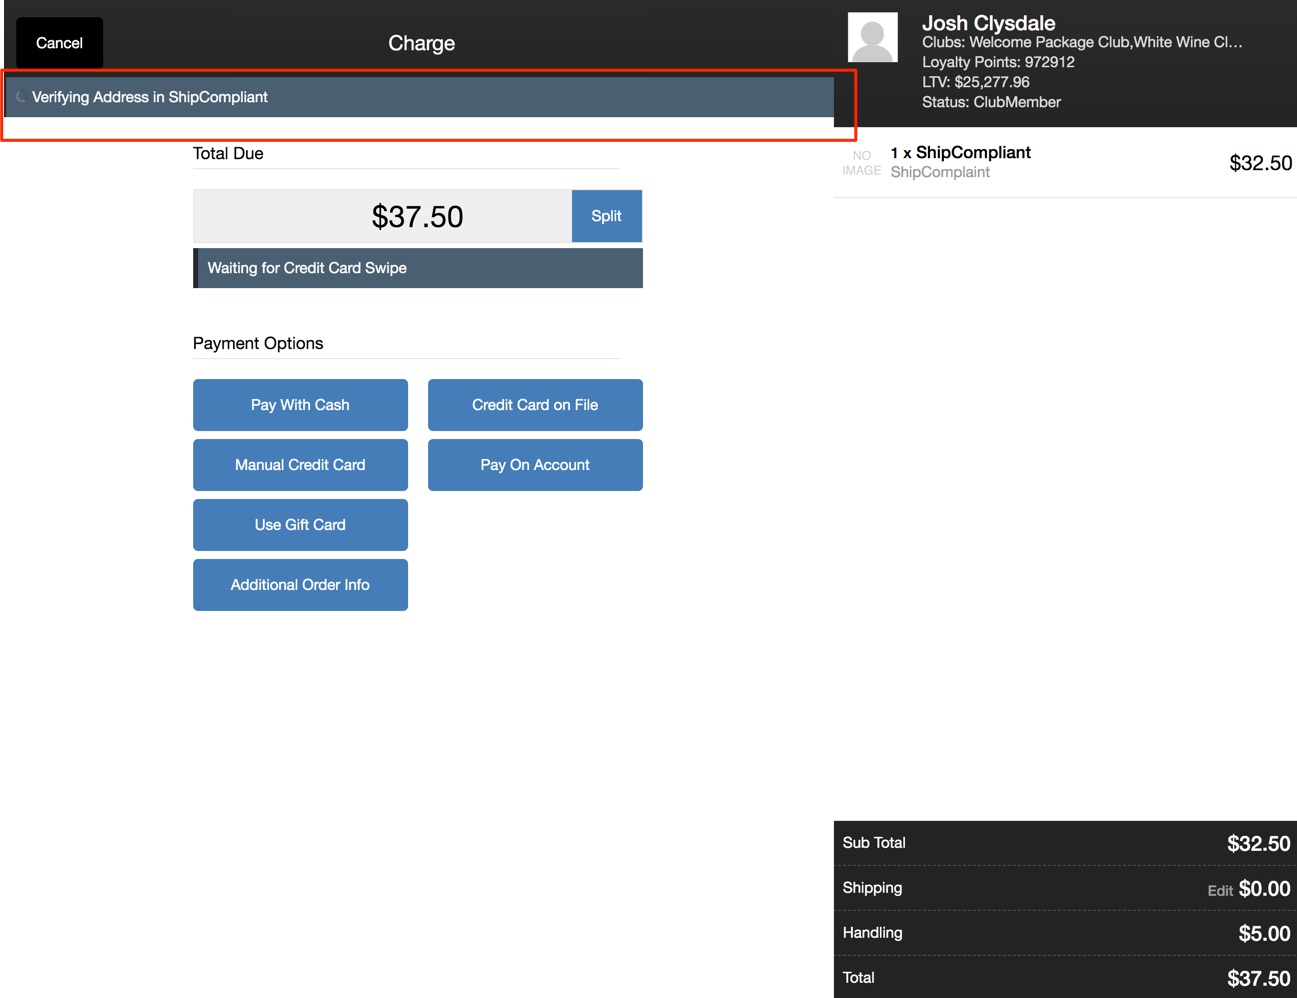
If there are any issues, you will see a warning message outlining the reason for the Compliance Check failure. We recommend double checking the Shipping Address with the customer if you see these warnings.
If you choose to continue on and a POS order is quarantined due to an address issue, you will be notified when it fails compliance like so:
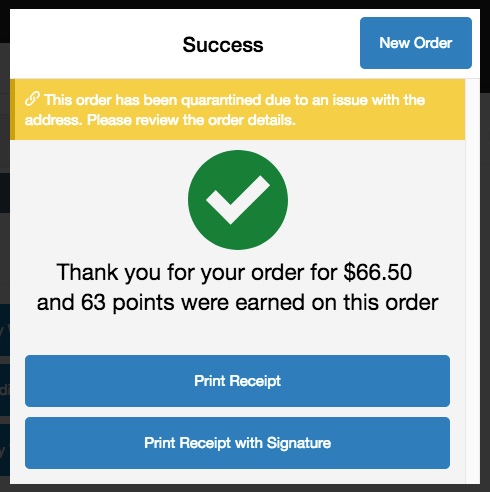
To find details about the compliance failure(s), click on the error message, which will take you to:
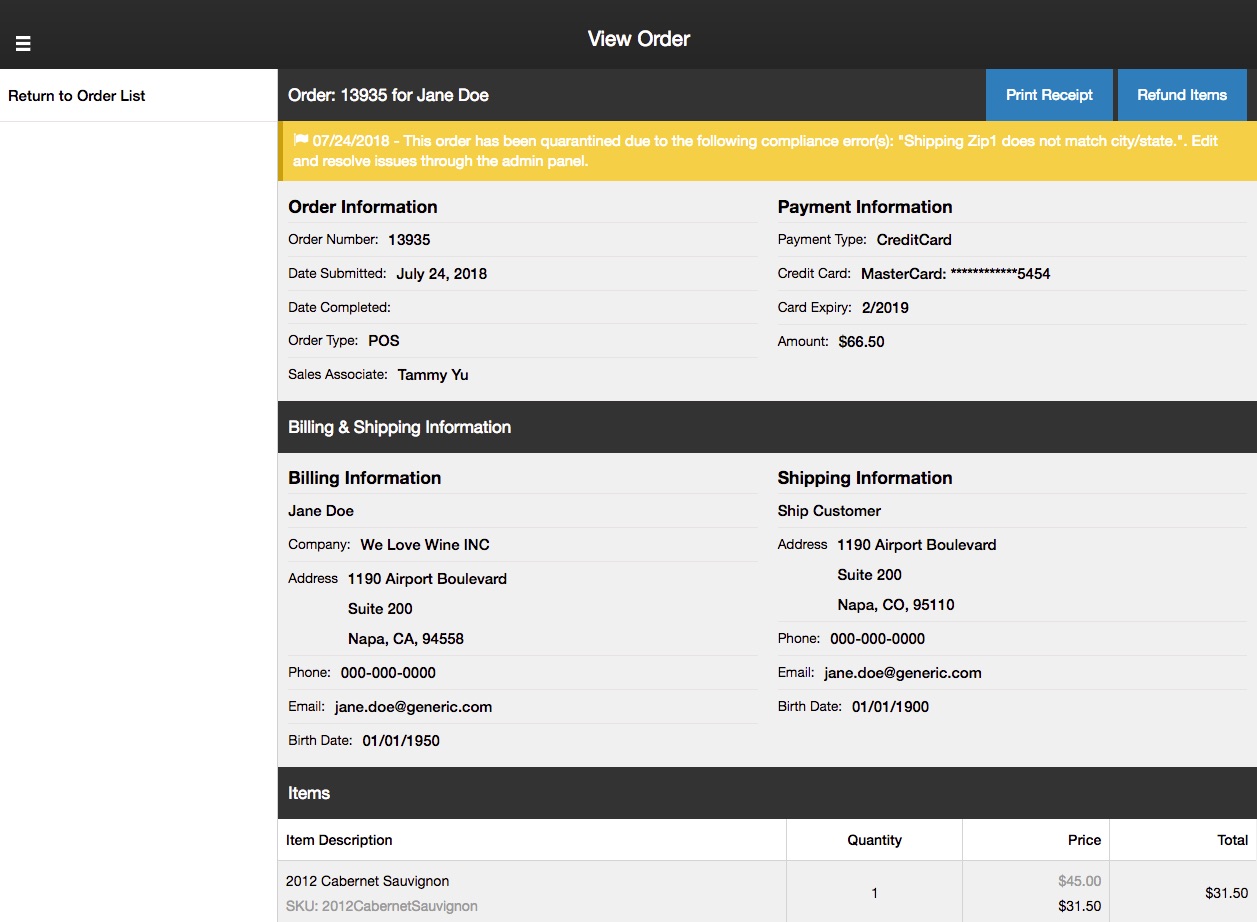
To address the compliance failure(s), you will need to log in to the Admin Panel and follow the steps outlined here.
Note that if an order is quarantined for a reason other than an address error, you will not receive this popup alert. You will need to manually navigate to an order to find out if it is quarantined.