- Old Reports
- Sales
- Custom Sales Reports
Customizing a Sales Report
This page documents an older/sunset version of our reporting tools - for documentation on the latest version click here.
With the Memorize Field in Vin65 you can customize your reports. Reports that currently support customizations are:
| Sales By Date | Sales By SKU | Abandoned Carts |
| Sales By Order Number | Sales By Tender Type | Cost of Goods |
| Sales By State | Sales By Tender Detail | Payment Report |
| Sales By Category | Sales Detail | Ship Compliant 1011 |
| Sales By Sales Associate | Sales Detail X |
Add New Custom Filter: Learn how to add a new custom memorize filter to view sales reports. Learn More >
Customize Reports: Learn about the customizable filter options for sales reports. Learn More >
- General
- Order Type
- Order Status
- Shipping
- Vendors
- Ship States
- Payment Statuses
- CSV Columns
- HTML Columns
Edit Custom Filters: Learn how to edit and modify custom Memorize that have already been saved. Learn More >
Watch the tutorial video and read the following text to learn how to customize your reports:
Add New Custom Filter
1. Go to Reports > Sales and select the specific sales report that you wish to customize (i.e. Sales By Date).
2. In the blue filters box select Memorize.
3. From the Memorize drop down menu, select Add New.

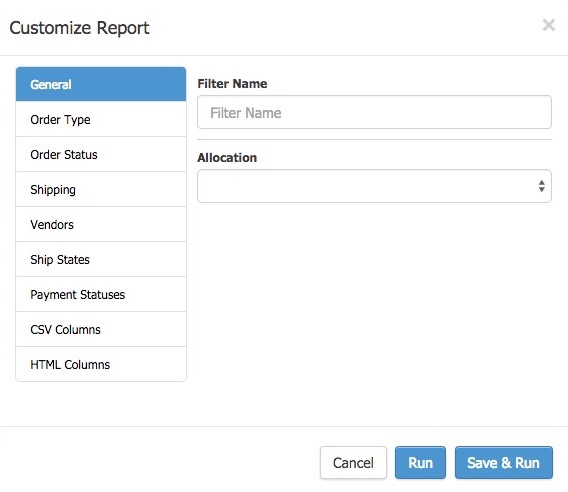
4. From the Customize Report pop-up window, begin by entering a title in the Filter Name field. This title will help you to pick the same saved filters in future, if you choose to save.
Do I need to use the Allocation dropdown?
For the majority of report filters you will not use the Allocation options. You would only use this if you are currently using the allocation tools in Vin65 and want to report on the orders related to a specific allocation.
For the majority of report filters you will not use the Allocation options. You would only use this if you are currently using the allocation tools in Vin65 and want to report on the orders related to a specific allocation.
5. Next navigate through each of the sections (General, Order Type, Order Status, Shipping, Vendors, Ship States, Payment Statuses, CSV Columns, HTML Columns) adjusting any filters you wish to apply to your report.
6. Click Save & Run if you want to save your report customizations for use in the future and run an updated version of the report or click Run if you simply want to run the report without saving your customizations.
Customize Reports
The following text will give you information on each section within the Customize Reports window:
General: Give your custom filter a name, and select if you'd like allocated sales includes. Learn More >
Order Type: Filter your report by ClubOrder, AdminPanel, POS, and other Order Types. Learn More >
Order Status: Filter your report by Completed, Cancelled, Quarantine and other Order Status. Learn More >
Shipping: Filter your report by Shipped, Picked Up, Not Shipped, Not Picked Up and other Shipping statuses. Learn More >
Vendors: Filter your report by the integrated webservice vendor where the order originated. Learn More >
Ship States: Filter your report by specific ship states or provinces. Learn More >
Payment Statuses: Filter your report by Paid, Declined, Refunded, Pending, and other Payment Statuses. Learn More >
CSV Columns: Select what data columns you wish to include in the CSV Excel export of your report. Learn More >
HTML Columns: Select what data columns you want to include in your report's quick view from the admin panel. Learn More >
General
In the General section, you can name your custom report filter, and select if you'd like the report to include or exclude specified allocation(s).
| Filter Name | The name of the custom filter. This is a required field. |
|---|---|
| Allocation | Choose if you'd like the sales report to include sales from either All Allocations, Exclude Allocations, or a single allocation. |
Order Type
You can select specific Order Type(s) to build a custom report filter on. Order Types include all of the Order Types that are set up in your admin panel. Default Order Type selections include:
- AdminPanel
- ClubOrder
- iPad
- Marketplace
- POS
- Reservation
- Telemarketing
- Website
Want to know more about Order Types? Learn More >
Order Status
The Order Status section allows you to select specific Order Statuses to help filter your orders based on their current order status. Order Status selections include:
- All Order Status
- Submitted
- Completed
- Pending
- Hold
- Cancelled
- Quarantine
Shipping
The Shipping section allows you to select specific Shipping Status(es) to build a custom report filter on. For example, this can help you find orders that have or have not been shipped or orders that have or have not been picked up. Shipping Status selections include:
- All Order Shipping Statuses
- No Status
- Sent to Fulfillment
- Shipped
- Picked Up
- Handled Externally
- No Shipping Required
- Pending Carrier Pickup
- Not Shipped
- Not Picked Up
Want to know more about Shipping Statuses? Learn More >
Payment Statuses
The Payment Status section allows you to choose to filter your report by the specific payment statuses assigned to the orders. Payment Statuses selections include:
- All Payment Statuses
- Pending
- Submitted
- Authorized
- Paid
- Declined
- Refunded
- Voided
- External
Vendors
The Vendors section you can select specific Webservice Vendors that you have set up to integrate with Vin65. You will then be able to view sales processed through these webservices. Vendors selections include:
- All Webservice Vendors
- Vin65
- Other
- Call For Wine
- Napa Valley POS
- Oztera
- Vin65 RMS
Want to know more about Webservice Accounts? Learn More >
Ship States
The Ship State section allows you to select specific States and/or Provinces that based of the shipping address for an order. Select All States to include all applicable States/Provinces in the report. The Ship States/Provinces that you accpet orders from can be managed through your State Profile section.
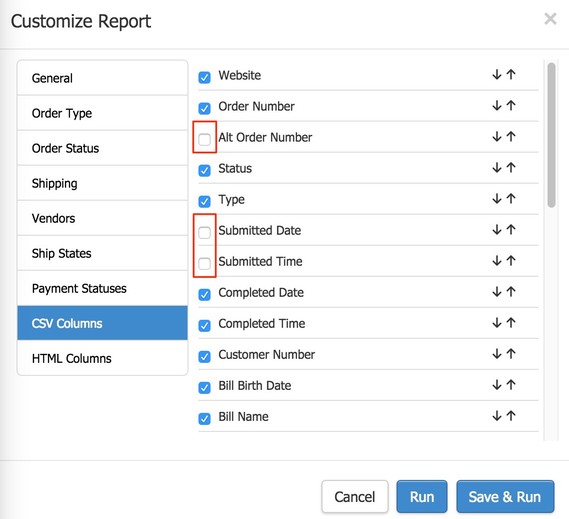
CSV Columns
The CSV section allows you to customize the CSV export file that is generated when you run the report with your custom filters. This means that columns in the default CSV file which is exported can be removed or reordered. Once the filter set is saved you can use it over and over to reproduce the same CSV file export. Use the steps below to alter the CSV export for your report:
1. By default all of the pre-built columns for the report will be selected. Use the checkbox next to a type to uncheck or deselect a column from appearing in the CSV export.
2. To reorder any columns use the up and down arrows next to a column to reorder the selected columns for your CSV export.
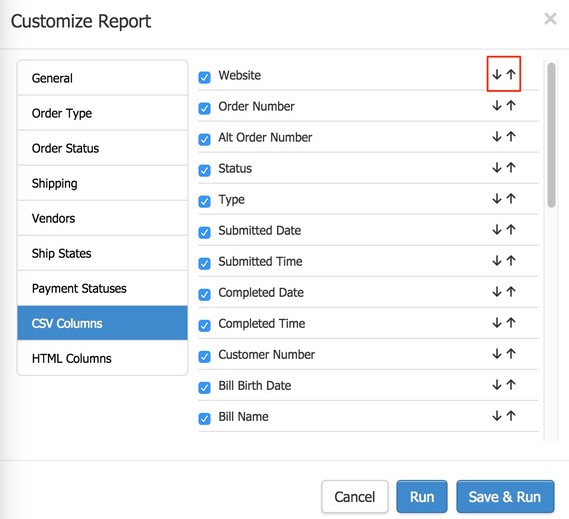
3. Click Save & Run to keep the export formatting for future use.
HTML Columns
These are the columns of data that will appear in the quick view of the specified custom sales report in the admin panel. Default HTML Columns appear as Order Number, Status, Type, Submitted Date, Bill Name, Bill Email, Sub Total, and Total.
1. Use the checkboxes to add or remove columns that you would like to appear in the HTML view in the admin panel.
Only a maximum of 8 columns can be displayed at a single time. If you try to select more than 8 columns you will be prompted to reduce your selections to 8.
2. Use the up and down arrows next to a column to reorder the selected columns you wish to have in your HTML view.
Edit Custom Filters
1. Go to Reports > Sales and select the specific sales report that you wish to customize (i.e. Sales By Date).
2. In the blue filters box select Memorize.
3. From the Memorize drop-down menu, select the name of one of your pre-existing report filter.
4. In the filter list below your report Edit Filter.

5. The Customize Report window will pop up where you will be able to view and modify all of the filters currently being used in your custom report.
6. Once you've completed your changes, select Run to run the report without saving, or Run & Save to run and save the report.
7. If you wish to remove the custom filter, click Delete in the Customize Report window.