- POS
- POS Restaurant Features
POS Restaurant Features
The POS Restaurant Features option, gives you the ability to start a table, hold a table, resume a table, and send items to a selected printer, such as a bar or a kitchen printer.
Enable POS Restaurant Features: Learn where to enable the tools using Has Table Seating on your POS Profile. Learn More >
Restaurant Prep Areas: Learn how to create prep areas (bar, kitchen, etc) to send your table orders to. Learn More >
Start a Table: Learn how to start a new table from the POS menu. Learn More >
Add Items to a Table: Learn how to add items to a table. Learn More >
Hold the Table: Learn how to hold an existing table. Learn More >
Resume the Table: Learn how to resume or remove a table that has been placed on hold. Learn More >
Send Items to a Printer: Learn how to send items to a selected printer. Learn More >
Guest Count Report: Learn how you can view the number of club and non-club members that visited in a day as logged through the POS Restaurant Features. Learn More >
Start a Table
Before can use the table tools you must first enable Has Table Seating on your POS Profile, and create Restaurant Prep Areas to choose from when sending tables to a printer.
Follow the steps to learn how to start a new table:
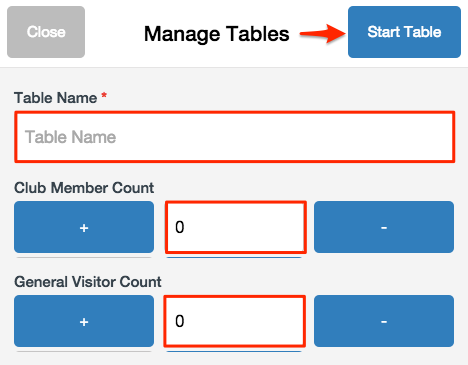
1. From the POS menu, select Start a Table.
2. In the Manage Tables window, give your table a Table Name, and use either the [+] and [-] buttons, or type in the number, to input the Club Member Count, and the General Visitor Count.
**Do not input special characters into Table Name otherwise receipt will generate an error and not be able to print.
Statistics on the number of visitors, both club and non-club members, will be visible using the Guest Count or Daily Activity reports.
3. Click Start Table.
Add Items to a Table
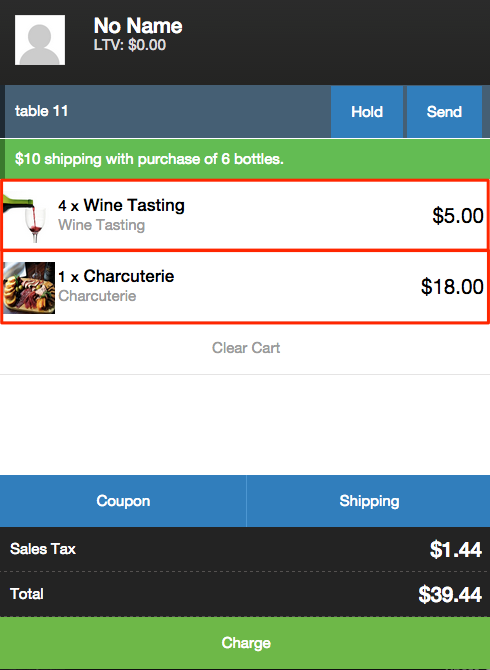
Adding items to a table is the same process as adding items to a cart for checkout customers. After a table has been started, you can follow the steps to learn how to add items to a table:
1. Through the product menu selection, choose an item and the appropriate quantities you wish to add to your table.
2. Once selected, the items will appear in the right hand Cart menu.
Hold a Table
Follow the steps to learn how to hold a table that you have started:
1. From the right hand Cart menu, select the Hold button.

2. The items and quantities within the table will be placed on hold until you are ready to resume the table.
Resume a Table
To resume a table, it is the same process as resuming an order. Follow the steps to learn how to resume or remove a table that has been placed on hold:
1. From the POS Menu, select Resume an Order.
2. In the Resume Order window, there will be a listing of Open Tables and their Sales Associate.
3. Find the Table Name you wish to reopen, and click Resume.
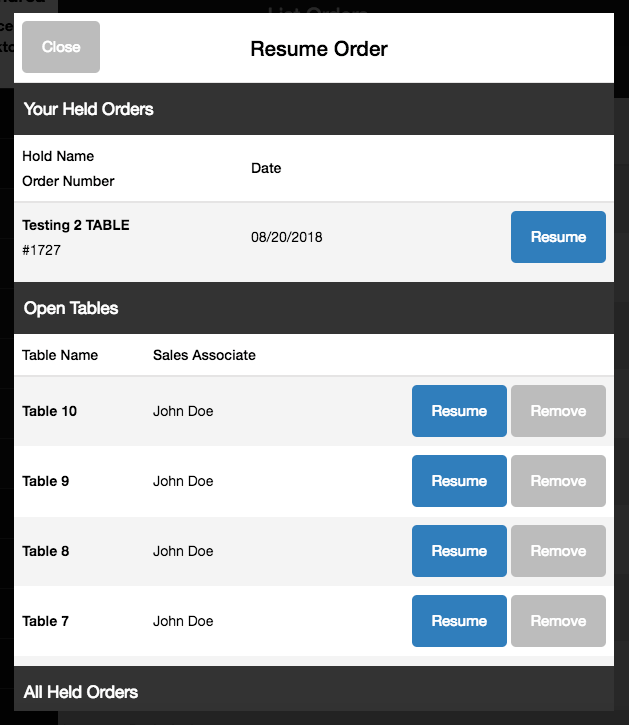
4. The table will now appear in the right hand Cart menu for you to continue with.
5. Alternately, you can also remove the table by clicking Remove next to the desired Table Name in the Resume Order window.
Send Items to a Printer
Before a table order can be sent to a printer you must first enable Has Table Seating on your POS Profile, and create Restaurant Prep Areas to choose from when sending tables to a printer.
When sending items to a printer, you have the option to send selected items to specified printers. For example, you may want to send food items to a kitchen or prep area printer, and wine items to a tasting room printer. Follow the steps to learn how to send items from a table to a printer:
1. Review the order to ensure the correct items and quantities are in place.
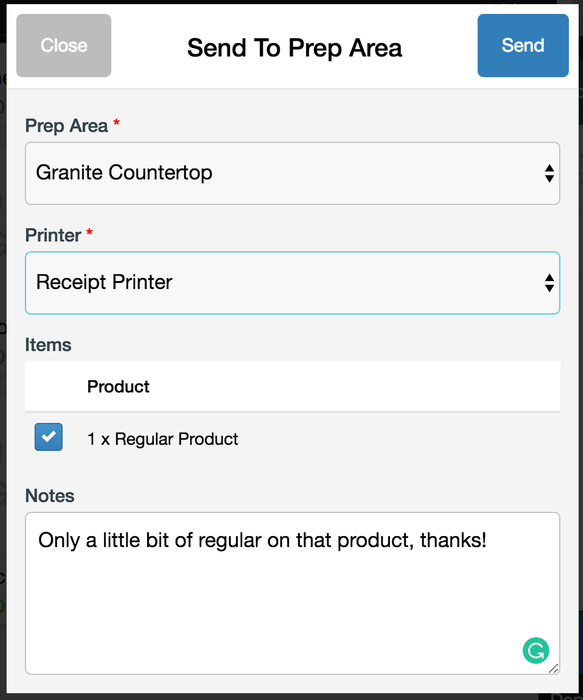
2. Click Send in the right hand Cart menu
3. In the Send To window, select the Prep Area, Printer, Products and any Notes about the order that you wish to send.
4. Click Send to print the selected items.
5. If you wish to send any remaining items to a different printer, you can follow the steps above. Any items that have not yet been sent to a printer will remain in the Send To window.
Items may only be sent to a printer if they are still in the cart, have not been charged, and have not already been sent to a printer. If you charge a table's order the table will be closed out. Additional orders will need to be placed under a new table.